Tuesday, October 8, 2013

Cave Paintings

One of the examples I created for my students.
 The students entered the dark classroom to see a projected image of a cave painting on one wall. We looked at several slides of cave paintings, discussing and pointing out the animals we saw, talking about how the cave artists made their art with no paper or paints like we have today.
2nd-3rd grade classroom "painting" with chalk pastels.
 Then, the students got ready to make their own cave painting for the cave installation at our end of semester art show. We used crinkled up brown paper and charcoal and chalk pastels to draw our animals and symbols. The students learned how to draw with and then smudge and blend the chalk pastels.
Integrating symbols into our cave paintings.
 During the last 5 minutes of class, we played with real mud to add dots, lines and hand prints to our cave paintings. I can't wait to see everyone's reactions when the cave is all built. It will be a chance for the artists to rediscover their cave paintings and show their families their artistic talent.
Cave paintings created during the day : pre-K through grade 8

Monday, September 16, 2013

Lotus Mosaic Mandala Pattern

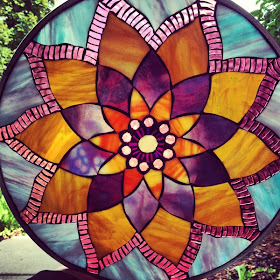
Lotus Mosaic Mandala Modification in Purple, Amber, & Blue
My lotus mosaic mandalas have been getting a lot of attention lately, which is awesome! I love making these glass on glass mosaics. I've got them at two local shops in Lincoln, Nebraska: Out of the Box and Architectural Glassarts; and coming soon to Flowing Stone Art Gallery in Beatrice, Nebraska.
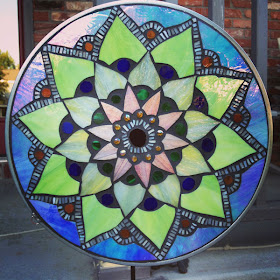
Lotus Mosaic Mandala in Blue, White, Yellow & Green
If you'd like to commission a mosaic mandala, I would love to make it for you! Just contact me with your ideas (colors, size, etc.) HOWEVER, maybe you want to make one for yourself? I've had a request for the pattern and instructions, and since I love teaching others, I've made it available for purchase on my etsy site. Or, again, you can just contact me!

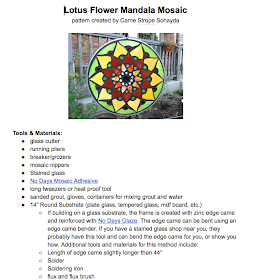
6 page instruction booklet that comes with pattern, full of links, sources & resources
6 page instruction booklet that comes with
pattern, full of links, sources & resources
For $15, you get a full size 14" pattern of the layout for the lotus mosaic mandala and six pages of instructions! This pattern has modifications for beginners to advanced glass cutters and mosaicists. Enjoy!

Lotus Mosaic Mandala in Pastels
Testimonials:

From a previous student, Debbie: "Anyone who wants to learn from an excellent glass art instructor should check out Carrie's wealth of information that she shares with the public via her youtube videos, her blogs, and the various classes she teaches throughout the US. I have never been so impressed with another teacher's preparations and willingness to share and educate other glass artists or want to be glass artists. I met Carrie several years ago when she had been volunteering as an aide in a glass studio I started taking classes at. She was always trying new techniques and trying to learn all she could then, but it is very apparent that Carrie's dedication has made her someone to watch in the glass community. She is a true inspiration, and although she is many years my junior, I aspire to be just like her when I grow up! ; ) I wish she were still here in Napa, but honestly, anyone pretty much anywhere can benefit from her passion for glass. Carrie does nothing half (gl)ass...I recently was admiring her stained glass mandalas and asked her if she might be willing to sell the pattern. Carrie was more than willing to sell her pattern and sent me via email an incredibly detailed 6 page instruction pack with links of her youtube videos, as well as supply sources. The pattern is on its way to me now, and I know that should I need any help, she's just a click or two away. Carrie you ROCK!"

Another mosaic artist:
"Thanks, Carrie. And I always enjoy talking to you and watching your demonstrations at the Las Vegas Glass and Bead Show. You definitely know your stuff!"

Tuesday, September 10, 2013

HOW Stuff Works: How Glass is Made

From Discovery Channel's "Some Assembly Required," visit a float glass manufacturer and see how they turn raw materials into glass.

Thursday, September 5, 2013

Wrapping a Glass Base with Zinc Edge Came


Several people have asked how I attach the hangers to my Glass on Glass Mosaic Mandalas.
So, here is a "short" 20 minute video lesson that describes the process. Enjoy!


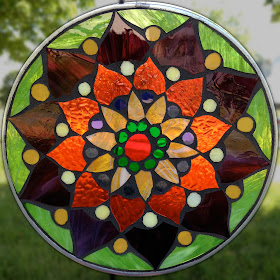
Red, Amber and Violet Lotus Mosaic Mandala
View more mandalas at calyxann.etsy.com!

Friday, August 30, 2013

Prepping for Homeschool Co-op Art Class

I'm finding all sorts of great resources online while preparing for my 12 week semester of glass art class with a homeschool co-op.

Website Slideshow (and test, if you're into that) ~ Elements of Art

Let me share with you some great short documents I found relating to the Elements of Art...
The Elements and Principles of Art (PowerPoint)


Line:
Elements of Art The building blocks of art line,


Shape:
Elements of Art - Shapes


Color
Elements of Art - Color

Value
value

Form

Texture
Drawing Texture

Texture Power Point

Space
Artist's tricks to show space in art work_

Recap of the Elements of Art...
Elements of Art

Wednesday, July 10, 2013

Fused Glass Fun with Girl Scouts

The girls creations at the end of our 2 hour session.

As a Girl Scout Community Collaborator, I work with Girl Scout troops to create glass art. Sometimes we meet for mosaics, but this post is all about glass fusing! Earlier this year, I worked with a Girl Scout troop from Council Bluffs, Iowa. There were 6 girls able to attend the meeting. We talked about how glass is made, how to "play" with glass safely, and how to create art with glass.
A kiln full of glass before firing.
I give each girl two sheets of clear glass; one for a plate and one for a sun catcher. After digging through my scraps and piecing together their larger pieces, they can make pendants (or magnets) for the rest of the session. Generally, each girl will finish all three projects. Some may end up with more pendants, and some spend a lot of time piecing together the perfect plate (and need help from mom or friends to finish other projects).
Same kiln - after firing.

After our session, the girls go home and I get to work! After cleaning up the work area and letting the glue dry (so the pieces don't shift on the way to the kiln), I prep the kiln for firing. I need to coat the kiln shelves with kiln wash to prevent the glass from sticking to the shelf permanently. Then, I need to let the kiln wash dry or else the glass pieces end up with kiln wash stuck to them! I generally speed this part up by running the kiln up to 500ºF for 30 minutes and then letting it cool back down to room temperature.
Close up of plates pre-fire

Now that the kiln is prepped, I can load all the pieces in it. If I'm lucky, I can fit everything in the kiln at once. However, since I seldom give strict rules when the girls are constructing, I'll sometimes have one piece that needs to go in the kiln at a different temperature. This is a decision I make based on my years of experience firing glass taking into consideration how much glass has been used, whether or not it's even across the entire sheet of glass and how I know the glass will act in the kiln.
Detail shot after firing.

The glass comes out of the kiln in one piece, but it's all flat. For the plates, I need to put the glass back in the kiln in molds to shape them and make them three dimensional. This is done in a separate firing because the temperature doesn't need to get as hot as it did for fusing the glass together. (By the way, glass fusing temperatures are around 1480ºF, whereas slumping temperatures are only around 1250ºF.)
Fused glass sun catchers after firing.

When all of the glass is finished firing, I clean up the edges. Sometimes little bits of glass will end up grabbing the kiln shelf and creating needles. I grind those off so that the glass art doesn't bite! Then, I wrap it up so it won't break and label it with each girls name, and they're ready to be picked up! Generally the whole process takes 5-7 days. If this is something you'd like to do with your Girl Scout troop, please contact me for a list of available dates. Current pricing is $25 a girl, which is a steal!
Each girl made one plate, one sun catcher, and as many pendants as she wanted in a 2 hour session.

Mosaic Stepping Stones with Girl Scouts

As a Girl Scout Community Collaborator, I work with Girl Scout troops to create glass art. Sometimes we meet for glass fusing, but this post is about mosaic stepping stones...
I prep the paver stones, so we're ready to get started when you get here.
There are a few different approaches to making mosaic stepping stones and as an introduction to the process I choose the easiest and most accessible way! Instead of having to build upside down, pouring cement and having to wait to get your stepping stone back, we use paver stones from the hardware store. I gather all the materials and get them prepped before you show up. I choose the 6" x 8" paver stones, because that guarantees that we finish close to the 3 hour mark. After I clean the stones, I prep them with the adhesive. (It's a heat set adhesive that cures quickly to allow us to finish the class by grouting, instead of waiting for glue to dry.)
Piecing the glass together on the paver stones
Then, when you show up, we talk about how to safely "play" with glass, how to cut it with nippers and rules for arranging a mosaic and using the groutlines for design. If the weather permits, we work outside the whole time. Otherwise, we'll work in my studio. (For large groups, we meet at Architectural Glassarts.) I encourage everyone to come to class with an idea of what they might like to make: flowers, cars, animals, sun, moon, ocean, mountains, pineapple, etc. It doesn't mean you won't get inspired by the glass to make something else, but it helps get past the "creative block."
Grouting the stepping stones
After covering the paver stone with glass, it's time to pop them in the oven to cure. Then, we take a studio tour, and I talk more about glass and different things you can do with it. If you'd prefer to make this snack time, we can definitely do that, too! We have about 30 minutes to wait while the stones heat up and then cool back down and are ready to grout. Then it's time to get dirty! You may want to wear clothes that can get stained...
Stepping stones finished in 3 hours
We grout in the grass because it's super easy to clean up that way. I show you how to mix the grout and help you to get the right consistency. Then, we spread the grout across our pieces. It needs to sit for 5-10 minutes before we can polish it off and make the glass shine and sparkle, but then we're finished and the stones are ready to take home with the girls!
Beautiful flower stepping stone

If this is something you'd like to do with your Girl Scout troop, please contact me for a list of available dates. Current pricing is $25 a girl, which is a steal!

artVenture 2013 - Girl Scouts and Fused Glass

Getting started - talking about how glass is made.
This year's artVenture took place once again at Architectural Glassarts in Lincoln, Nebraska. Thanks again to Rod Scott for his generosity in offering up his space!
We started out talking about how glass is made, how it comes to the glass shop, how to cut it and what happens after it goes in the kiln.  After the girls piece together the glass to create their design, the plates go into the kiln for an initial fusing that makes all the separate pieces into one. Then, the flat pieces go back in the kiln to get slumped into a mold. When, they come out of the kiln after the second firing, they have taken on the shape of the mold. Each group was given glass that was pre-cut to match the molds on their table.  We broke into groups and started brainstorming themes for our pieces. 
"Cold Blaze"
6.75" x 14.5"
Artists: Kaity, Jessie, Haley

Kaity, Jessie and Hallie created "Cold Blaze," a combination of an underwater scene under a blazing sunset. Can you see the fish, turtles and sea plants?

"Four Seasons"
set of four: 5.75" x 5.75"
Artists: Belle, Emma, Carrie

Belle, Emma and Carrie came up with a seasonal theme to go with the four molds they were presented. Clever, huh?

"Sunsets"
8.5" x 8.5"
Artists: Paige, Anna, Hallie
Paige, Anna and Hallie created an abstracted sunset for their piece...

Part sheets created for "Fireworks"
Artists: Noa, Laci, Krista, CJ, Jenny, Madison
...which leaves the last and largest group. This group of 6 were given glass blanks, but no mold. Generally, I coach the girls as they make their collaborative pieces which are donated to the artVenture auction. Additionally, I submit a piece of my work to be auctioned. This year, I wanted to try something different for the last piece. So, the girls made the blanks that would be cut up to become a larger panel that was pieced together and framed by me. I wasn't sure how they would react to the suggestion that they would make something specifically so it could be cut apart again. However, I think the fact that they don't get to keep the collaborative piece anyway really helps. (All the girls do get the chance to make fused glass pieces to take home. This year they all made 4"-6" plates and jewelry pieces.)
"Fireworks"
26" x 10.5"
Artists: Noa, Laci, Krista, CJ, Jenny, Madison
Pieced together by Carrie Strope Sohayda
I absolutely love how the panel turned out and once again all the girls made fantastic fused glass art!

Sunday, May 5, 2013

Partners for Otoe County Afterschool Glass Art Club

Syracuse Middle School Afterschool Art Club
Nebraska City Middle School Afterschool Art Club
Opening reception at the Kimmel Harding Nelson Center for the Arts

Tuesday, April 30, 2013

May Exhibition at Meadowlark Coffee

During the month of May, I'll have some of my fused glass, stained glass and mosaics on display at Meadowlark Coffee in Lincoln, Nebraska. My friend Lilith has hung her paintings alongside my work, and I think they complement each other nicely.
If you're in Lincoln, stop by and check it out while having a cuppa joe or tea!

Friday, March 29, 2013

Undersea Gardens Plate Using 96 Cane and Sumpy's New Ripple Swoop Mold


Carrie Strope Sohayda ~ "Undersea Gardens" 12" x 6"
Materials:
  • 1/4 lb 96 Fusing Canes Alternating 3 Red 2 Aqua Inner Helix
  • 1/4 lb 96 Fusing Canes Green 5 Line Inner Helix
  • 1/4 lb 96 Fusing Canes Cobalt 5 Line Inner Helix
  • Spectrum System 96 Dark Blue Transparent
  • Spectrum System 96 Clear
  • Spectrum System 96 Cherry Red Transparent
  • Spectrum System 96 Medium Green Transparent
  • Spectrum System 96 Deep Aqua Transparent
  • Slumpy's SM-6130 Ripple Swoop Mold
  • HoneyDoo Zuper Glue 
Tools:
  • Mosaic Nippers
  • Fine Tip Sharpie
  • Ruler
  • Glass Cutter
  • Running Pliers
  • Safety Glasses
  • Kiln
  • Papyros Shelf Paper
  • Kilnwashed Kiln Furniture
1. Begin by cutting glass and nipping cane.
•Cut two 2” x 12” and two 1½” x 12” pieces of clear glass.
•Cut two 1½” x 12” pieces of dark blue glass.
•Cut two ⅜” x 12” strips each of dark blue, cherry red, medium green, and deep aqua.
•Mark fusing cane at 2” lengths. Using mosaic nippers, cut fusing canes in each color to 2.”

2. Layout pieces according to pattern.
•For the first layer, lay down smaller piece of clear glass in the middle. On either side, place the
strips of glass on edge, and then lay down the  dark blue pieces of glass to the outside.
•For the second layer, place the two remaining pieces of clear glass on top of the dark blue, and lay the cane out across the clear piece in the middle, securing the outer pieces with a dab of glue.

TIP: If you build on a piece of cardboard, you can easily transport and load the pieces into the kiln.

3. Full fuse & then slump.

Pattern Alterations: •To eliminate strips, add ½” to
the width of the dark blue and clear rectangles.
•To avoid using kiln furniture or fiber paper dams,
cut two ½” x 2” pieces of dark blue & clear to hold
the fusing cane in the middle section.
FIRING TIPS:
•To prevent the fusing cane from shifting off of the base layer of glass while firing, use kiln dams
against the ends. If you don’t have dams or fiber paper, you can alter the pattern using the above
instructions.
•If you want to eliminate bubbles from between the canes, space the canes so that there is a little
wiggle room between the pieces.


Suggested full fuse firing schedule:

200 dph to 1000ºF hold for 45 min
50 dph to 1250ºF hold for 25 min
500 dph to 1450ºF hold for 45 min
full to 1000ºF with no hold
200 dph to 950ºF hold for 60 min
100 dph to 800ºF with no hold
300 dph to 120ºF  with no hold

NOTE: This is a fairly conservative firing schedule, but you may need to make changes based on your kiln.

Friday, March 8, 2013

NATA 2013 Youth Art Month Exhibit at the State Capitol

In my recent wanderings at the Nebraska State Capitol, I happened upon an exhibit of art organized by the Nebraska Art Teachers Association on the first floor of the capitol rotunda.
NATA 2013 Youth Art Month Exhibit


The pieces on display not only showed artistic talent, but told the stories of how they were created. I ran across many great lesson plan ideas. (NOTE: I forgot to write down the names of the pictures I took, and so I only have two teachers quoted. If you happen to know the teacher whose lesson plan is listed, could you let me know?)
"Dog portraits made with newspapers seemed like a great idea. I had both the first grade and fifth grade do this lesson. The fifth grade created them first. They worked from a photograph of a dog they found on the internet. There was lots of trial and error as the children tried to created the shapes they saw in their dog's photograph. After all the shapes were glued down pastels were used to give their dog more dimension. I simplified the lesson for the first grade and their projects turned out as nice as the fifth graders." ~from the paper accompanying the piece

Living Art ~ Nebraska's State Capitol

The state capitol building was built between 1922-1934 with funds from a special assessment tax and was completely paid off by the end of construction. The architect, Bertram Grosvenor Goodhue died 2 years into construction which laid the way for the incorporation of Native American symbology (as Goodhue is referenced as saying the incorporation of American Indian symbology would make the building look like a tipi.)
 I grew up in Nebraska and took many field trips to the State Capitol building. The building is quite amazing and you hear several stories and references to it if you live around here. I won't go into the rather colorful nicknames it's been assigned due to the fact that Nebraska is rather flat and the capitol building is tall and upright. I'll leave that to your imagination...

Friday, January 4, 2013

Clinton Elementary School Residency ~ Mosaic Glass Quilts

In December, I spent one week with K-5th graders at Clinton Elementary School in Lincoln, Nebraska. In addition to creating fused glass snowflakes to take home and enjoy, we collaborated on a glass quilt that will hang in the school for all the students, staff and visitors to enjoy for years to come. I'm thrilled that the International Quilt Study Center is going to host the opening reception in May for First Friday. I can't wait for the kiddos to share their experience!
Pre-installation picture of the six 18" x 24" panels
  We spent the week with color theory and worksheets figuring out the quilt blocks we wanted to use, what shapes made up the blocks we chose, and playing with different color combinations to find our favorites.