Tuesday, September 10, 2013
HOW Stuff Works: How Glass is Made


Wednesday, July 10, 2013
Mosaic Stepping Stones with Girl Scouts
 |
| I prep the paver stones, so we're ready to get started when you get here. |
 |
| Piecing the glass together on the paver stones |
 |
| Grouting the stepping stones |
 |
| Stepping stones finished in 3 hours |
 |
| Beautiful flower stepping stone |
If this is something you'd like to do with your Girl Scout troop, please contact me for a list of available dates. Current pricing is $25 a girl, which is a steal!
Friday, October 14, 2011
Glassline Paints on Clear Glass

I love using Glassline paints to create patterned glass and this technique is one of the easiest ways to get a complicated look. Shake the bottles well and add water if you need to thin them out. Use a skewer if you need to stir. I always start my line in an extra bowl, to make sure that the consistency is right. This bowl becomes my bowl o' brown. All of those colors mix and dry in the bowl, then when I want a brown wash, I add water and brush it on the glass.

Here come the brides...

My great friend, Malindi, recently got married to her soulmate, Michaela. They're so cute together. It was a beautiful ceremony and a great party afterwards. I made them a little extra gift for their wedding that tied in the colors of their special day. So, they can wear these buttercream and blue bracelets and think back to the night they made their bond official.
Love you girls and have a great time in Thailand!!!
Friday, October 29, 2010
Fused Glass Coasters with a Quilting Theme
The very first step is choosing a quilt block pattern and colors for the block. But, seldom have I ever used a solid fabric in any quilt I've ever sewn. I'm drawn to patterns, usually large floral, colorful and bright designs. However, for this particular example below, I was aiming for mimicking earthy, woven-textile inspired "fabrics." So, in order to turn this:
 into this:
 I got out my enamel paints, glass powders and tools. For the pattern on the turquoise, orange and brown glass, I first went over them with a light wash of watered down enamel paints (I used Glassline paints, and I think it was a blend of paints from my used paint palette.). Once the light coating dried, I was able to scrape design lines into the paint, with a sgraffito-like technique. Then, I added gold paint highlights and splatters. On the french vanilla piece of glass, I used glass powders exclusively for my design, sifting through plastic needlepoint canvases in different shapes. To add a wavy texture on one side, I dragged a triangular wood-graining tool across the sifted powder.
After patterning my "fabric" glass, it needs to go in the kiln to a low temperature of around 1380-1400 F, just so the paints and powders adhere to the glass. Then, after the glass has cooled back down to room temperature, I can cut it into the pieces needed for constructing my quilt blocks.
 Each of these coasters used small squares and triangles pieced together and capped with clear glass. I love cutting all these small pieces! But, because of the number of pieces and the fact that I like a nice, straight, clean edge...I have to fire the pieces in the kiln twice more before they come out like this:
 The in-between stage involves lots of grinding (cold working) with a diamond coated bit and water to get rid of lumps and bumps on the edges of the pieces. They look so much nicer for the extra bit of work, though!
Next, come the rubber bumpers on the bottom corners to protect your furniture and make the glass coasters nicely stack-able.
 And for the final touch, I tie a ribbon of rafia around the coasters and attach one of my hand carved and printed lino-cut cards with the name of the quilt block:
 Voila! Now, all I have to do is photograph the pieces, photoshop the photos, write the listing description, upload my photos, tag the listing with keywords, calculate shipping costs and the cost of the product... Whew!
Simple, really...No? ;)
Wednesday, September 22, 2010
September Newsletter - Calyx Glass
 * *Nebraska-Home on the... | Calyx Glass “What’s in the Kiln?” September 2010 Newsletter |  * *...Shooting Range? |
Upcoming Events Saturday, September 25 from 10am – 6pm Sunday, September 26 from 10am – 5pm South Pointe Pavillions(27th & Pine Lake Road) Come by to say hi, and check out the new pieces I’ve been working on specifically for this show! There will be live music, art and artists from around the country, children’s activities, food and raffle prizes. 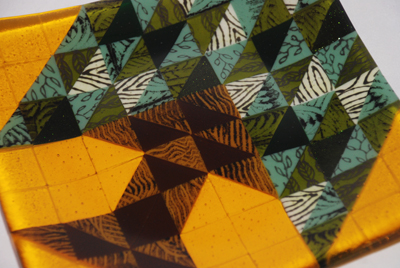 “Nature’s Bounty” Noyes Art Gallery (in the focus gallery) 119 South 9th St., Lincoln, NE 68508 Opening Reception: October 1, 2010 6:30- 8:00 p.m. (gallery open until 9 p.m) I’ve been invited to participate in a show at the Noyes Art Gallery for the month of October along with artists: Jan Pippitt (Mixed Media), Connie Backus-Yoder (Fabric Art), Julie Lemons (Pastels), and Donna Pozehl (Gourd Vases). Parking is available in the garage North of the gallery, and there will be refreshments. I’m so excited to finally unveil my Tree of Life in Four Seasons series. I’ve been attempting to make this pattern for the last few years with unhappy surprises sneaking out of the kiln. But, the series has finally come together and I’m so happy with how they turned out! Saturday, October 2 from 1pm - 9pm Sprague/Martell Community Center 17490 SW 14th Street • Martell, Nebraska (12 minutes South of Lincoln, Nebraska) Along with artist and craft vendors, there will be songwriting and guitar picking workshops, poetry readings, and LIVE music!!I’m excited to hang out for the day and listen to folk music by musicians from Nebraska, as well as Peru, Ithaca, NY, Tennesse and more! |
Classes offered at Architectural Glass Arts beginning in January, 2011:
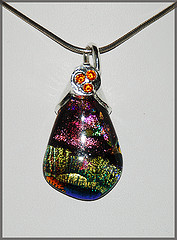 * *Dichroic Glass Tile for Jewelry Making | 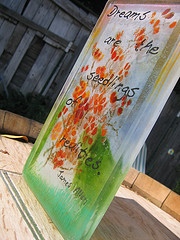 * *Fused Glass Block Painting |  * *Kiln Cast Glass Sculpture |  * *Quilting with Glass |
Still reading, huh? You probably want to know what’s the deal with me and the gun? Oh, well, okay...
So, my husband had never shot a gun before until just very recently. That’s not because my dad hasn’t been trying to make it happen (but that’s a whole ‘nother story involving a trip to Canada in the RV with a .357 gun under the bed). Well, we were finally able to make it out to the shooting range and shot off more guns and bullets than I ever thought I would. I capped a metal chicken at least twice! I look so in charge with the gun, though, don’t I? ;)
Well, I hope to see some of you this weekend at the Lincoln Arts Festival. I’m still finishing up a few pieces that are in the kiln as I write. Hope you’ve had a great summer!
Thanks for reading and feel free to forward this to your friends!
Carrie Strope
Thursday, November 6, 2008
Incompatible...Glass, that is....

Many beginners to glass fusing ask if they can use old stained glass scrap that they've got lying around. The broad answer to that question is "No" due to reasons of incompatibility. You see, glass that has been specifically formulated for fusing "plays nicely" only with other glasses that have also been specifically formulated in the same way. The label "COE," or "Coefficient of Expansion," is the general term that describes the rate in which glass expands and contracts upon heating and cooling. If you are using two glasses that have different COEs for fusing purposes, then your final result will end up looking similar to my lovely sample plate. (Again, the COE will generally get you through the long explanation, but if you want all the juicy details of compatibility, check out TechNotes 3: Compatibility of Glasses from Bullseye.)

However, you may not have a disaster like this the first time out of the kiln! For reasons best left to the Glass Gods, this particular plate did not crack until after it's second time out of the kiln. Only when I was engraving the bottom of the plate did it "pop" in two cracks diagonally down the middle. Initially, I thought it was my engraving that broke the plate.
So, I put the plate back in the kiln to fuse it back together at a full fuse, once again. Fortunately, the third time out of the kiln was a total crack up, around each and every one of the orange pieces, allaying my guilt at having cracked my plate upon engraving.

Monday, July 16, 2007
For Jacqueline and Christopher...

And that makes me feel even better about it:)
Thursday, July 5, 2007
Etching Glass - A Walk Through

First, I'll show you the idea behind the Rub 'n' Etch variety:


To the right of the bottle, you can see the baggy that has the stencil in it. The Peel 'n' Etch variety comes with a printed version of what the stencil will look like. You don't use this portion, it is for reference only. Also, I think you may be able to use this stencil more than once. But, I haven't tried to reuse it yet. I did keep it, and it seemed sticky enough to use again. Another bonus, if you wish, you can use the negative of the stencil as well.


For the Peel 'n' Etch variety of stencil, you can let the cream sit longer. I think I found something that said 5 minutes? You definitely can get more contrast by letting the cream sit longer.

Sunday, June 24, 2007
Tree of Life Kiln Casting

My lovely lump of clay became the tree of life that you see above.
After pouring a mold and allowing it to dry, I kilnwashed the mold and filled it with glass:


Sunday, June 10, 2007
Magic Misting Fogger Bowl

Another one of those projects that I've been wanting to work on, I finished the bowl for the LED lit misting fogger that Dad sent my way awhile back.

I used the gorgeous Spectrum 96 COE "Blackberry Cream" OpalArt glass.

The mister sits in the bottom of the bowl, and eventually I'll have a stand for the bowl to sit on.

Monday, June 4, 2007
Di Rosa Preserve Open to Public!
 The Di Rosa Preserve "encompasses 53 acres, including a 35-acre lake, plus 162 acres of natural wildlife preserve, all under Napa County Land Trust open space protection. Holdings include Milliken Peak and a stunning variety of habitats such as oak woodland, native grasses, ferns, herbs and wildflowers."
More than that, though, the Preserve is the legacy of Rene di Rosa and a treasure of art and architecture. According to one of the volunteers, there are more than 900 artists with 2000 pieces on display.
Normally, to see the entire grounds, you need to schedule a tour and are guided through the large museum of pieces that Mr. di Rosa has collected throughout his lifetime. But, Sunday was a different story. There were throngs of people wandering about, taking in the more than 2000 pieces of art adorning the walls and ceilings of the former di Rosa residence, hanging on the walls of the two galleries, and spotting the prairie garden. There was even a cow that walked on water!

My favorite of the glass art pieces was the glass chapel. It was beautifully leaded with poppies and irises. Aside from the glass being beautiful, the architecture of the house itself was amazing. Here's a detailed view of one of the apexes:

Another glass piece in the sculpture pasture was this glass pyramid that combined sandblasted glass and dichroic glass pieces to surround a rock that rested within a circle of broken glass bits. There were several petroglyph-like symbols left in the negative space surrounded by the sandblasted glass. The dichroic glass was attached with glue (UV glue is my guess) in areas of the base glass that were not sandblasted, creating windows for the sun to shine through and cast pinks, blues, greens, and yellows onto the rock below.

 To the left is a picture of part of the pasture with a view of the hilly vineyards surrounding it. (The winery at the top of the hill is Artesa.)
And, of course, if you're going to have a sculpture garden in the wine country, you must have a house made of bottles!
 something to the effect of, "I remember the place of my birth."
But, unfortunately I didn't write it down, and so cannot remember it...
Ah! My mind, the steel trap.
 Not glass, but provoking and somewhat eerie - though I suppose it would be close to frightening if viewed under a full moon - were the ghostly hands coming up out of the ground in the middle of a patch of California poppies.
There was so much art to see that the mere two hours we were able afford was a pittance. I had to rush off to work, so my visit was cut short, although the Preserve was closing down at that time anyway. This is definitely a day trip we will return to with visitors to the valley. Another one of the wonderful things to do in Napa when you get tired of wine tasting.
Thursday, May 31, 2007
Art Nouveau "Hanging Gardens" Necklace

My newest listing on Etsy, I've finished the third of my Art Nouveau-inspired stained glass necklaces. Although, the first two were gone before I was able to take pictures! Oops!
Spring Cleaning is in full force, so there's not much to add to this post, except that the bathrooms and the kitchen are clean!! Yea!
Monday, May 14, 2007
Stepping Stone Unveiled...

I got the original pattern for this stepping stone from a book in Michele's library. However, the mold it used was much bigger than the molds available in the studio. So, I had to sketch it out and scale it down before making the pattern pieces for cutting the glass.

I don't think it's visible in the photos, but I used iridescent glass for the hummingbird's heads. I also threw in some white iridescent glass in the background to give it some sparkle when the sun hits it. For the background, I used the mosaic nippers to break up a bunch of different colors of blue and white pieces to puzzle together.

LinkWithin
