Showing posts with label plate. Show all posts

Friday, March 29, 2013

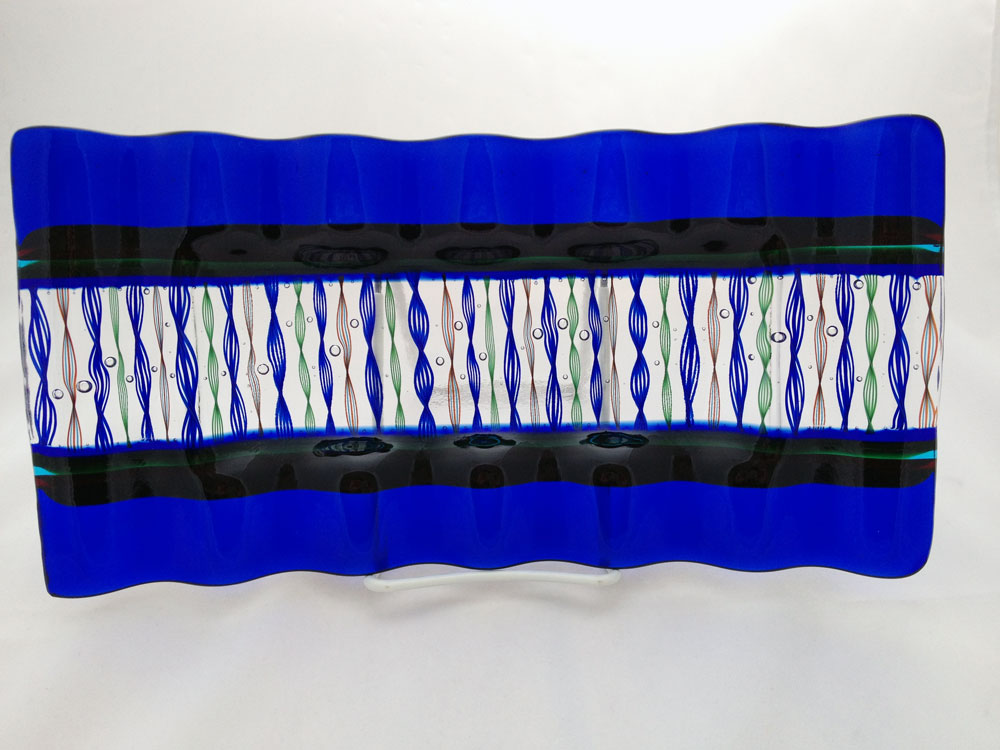
Undersea Gardens Plate Using 96 Cane and Sumpy's New Ripple Swoop Mold


Carrie Strope Sohayda ~ "Undersea Gardens" 12" x 6"
Materials:
  • 1/4 lb 96 Fusing Canes Alternating 3 Red 2 Aqua Inner Helix
  • 1/4 lb 96 Fusing Canes Green 5 Line Inner Helix
  • 1/4 lb 96 Fusing Canes Cobalt 5 Line Inner Helix
  • Spectrum System 96 Dark Blue Transparent
  • Spectrum System 96 Clear
  • Spectrum System 96 Cherry Red Transparent
  • Spectrum System 96 Medium Green Transparent
  • Spectrum System 96 Deep Aqua Transparent
  • Slumpy's SM-6130 Ripple Swoop Mold
  • HoneyDoo Zuper Glue 
Tools:
  • Mosaic Nippers
  • Fine Tip Sharpie
  • Ruler
  • Glass Cutter
  • Running Pliers
  • Safety Glasses
  • Kiln
  • Papyros Shelf Paper
  • Kilnwashed Kiln Furniture
1. Begin by cutting glass and nipping cane.
•Cut two 2” x 12” and two 1½” x 12” pieces of clear glass.
•Cut two 1½” x 12” pieces of dark blue glass.
•Cut two ⅜” x 12” strips each of dark blue, cherry red, medium green, and deep aqua.
•Mark fusing cane at 2” lengths. Using mosaic nippers, cut fusing canes in each color to 2.”

2. Layout pieces according to pattern.
•For the first layer, lay down smaller piece of clear glass in the middle. On either side, place the
strips of glass on edge, and then lay down the  dark blue pieces of glass to the outside.
•For the second layer, place the two remaining pieces of clear glass on top of the dark blue, and lay the cane out across the clear piece in the middle, securing the outer pieces with a dab of glue.

TIP: If you build on a piece of cardboard, you can easily transport and load the pieces into the kiln.

3. Full fuse & then slump.

Pattern Alterations: •To eliminate strips, add ½” to
the width of the dark blue and clear rectangles.
•To avoid using kiln furniture or fiber paper dams,
cut two ½” x 2” pieces of dark blue & clear to hold
the fusing cane in the middle section.
FIRING TIPS:
•To prevent the fusing cane from shifting off of the base layer of glass while firing, use kiln dams
against the ends. If you don’t have dams or fiber paper, you can alter the pattern using the above
instructions.
•If you want to eliminate bubbles from between the canes, space the canes so that there is a little
wiggle room between the pieces.


Suggested full fuse firing schedule:

200 dph to 1000ºF hold for 45 min
50 dph to 1250ºF hold for 25 min
500 dph to 1450ºF hold for 45 min
full to 1000ºF with no hold
200 dph to 950ºF hold for 60 min
100 dph to 800ºF with no hold
300 dph to 120ºF  with no hold

NOTE: This is a fairly conservative firing schedule, but you may need to make changes based on your kiln.

Monday, February 27, 2012

Valentine's Date Night at the LUX - fused glass plates

The Party Table!


What better way to spend Valentine's Day, than hanging out with your sweetie and being creative with glass?!? That's what we did this year at the LUX Center for the Arts in historic University Place, Lincoln, Nebraska.

Christy and Carl with an OU plate?
Six couples joined me for music, treats and fused glass fun! We all worked on plates (and pendants or sun catchers).

Friday, June 4, 2010

Fused and Slumped Sampler Platters


The Sampler Platter fused glass class is officially over and it was incredibly successful! I'm so happy with the plates that my students put together!


This is a detail shot of one of the plates. You can see the blue tile in the middle that was made during the frit, powder and stringer session has been capped with clear glass and accented with a tea light flame worked star-shaped stringer. As always, the dichro bits just don't photograph as strikingly as they appear in person.


This plate makes me think outer space, galaxy, the next frontier...Cool, huh? Great job, Alycia!


My plate was not as successful...Don't get me wrong, it showcased every possible technique I could think of for a beginners' class, to a fault! Unfortunately, some incompatible glass found it's way into my scrap bin. What?!? How the heck did that get there?!?


So, how do you tell it's incompatible? Well, if you've been following me for long, then you know I've run into this problem before...and thankfully, it's only MY plate that's ever affected! So, as soon as this plate made it's way out of the kiln, I knew something was amiss...

If you look closely at this photo, you can see the hairline fractures at the edge of the two blue squares. See that? That's incompatibility. The crack follows those blue pieces too well to be anything else! And guess what else? When I scored my plate to free the pieces, the knocks with the hammer (gentle taps on the underside of the score) broke those pieces out almost perfectly! So, after removing the blue glass, I refilled the voids with some aventurine green scrap pieces to melt back down into one. It's currently in the kiln, and with any luck will be a slumped platter within 24 hours!


Here is the other platter from the class that is awaiting a slump firing. It is also currently in the kiln. My new-ish Paragon Pearl-22 and I are still getting to know each other. The first firing just didn't fire hot enough or long enough and I wasn't happy with the fact that you could feel the seam between pieces on the underside of the plate. With Pooja's permission, I also drilled a little hole in the middle to see if I could squeeze the biggest bubble out. We'll soon see how well that turned out!

Friday, August 29, 2008

What happened?!? Stressed Out!


Voila!! I had recently set my Tree of Life fused glass plate aside, adding it to the pile that I had yet to photograph. I really love the aventurine green with the iridescent amber and swirly opal green/white glass. The colors are beautiful, reminiscent of summer, and make me want to do an entire series of winter, spring, summer and fall tree plates.

However....
when my wonderful fiance was tidying the house (and organizing my piles, he really is incredibly sweet), he noticed this crack in the plate. Now, I don't know if it's the weather, or if it's just that time in my life when I get to learn about stress and glass, but instead of throwing the blame on him (He must've dropped something on it, right?), I somehow knew that I had another stress case!
But, how exactly would I know? It surely doesn't look like a case of incompatible glass. Look at that S-curve that doesn't follow any seams. It runs right through the middle of at least three pieces of glass (which are all different colors). Reference this link for a wonderfully, hideous picture of incompatible glass.
Aha! My first chance to use the polarizing lenses that have been sitting in the studio, just waiting to confirm my suspicions... Whoa, Nelly!! Just look at that stress!!! I've been told that after a stress break, you can no longer see the stress halo when the piece is placed between the polarized lenses. Well, if that's true, then just imagine the halo that was apparent before this fracture.
So, what to do now? I'm going to put my poor little tree back in the kiln. Yup, throwing her back in. I'm gonna slowly go up to 1250 F and bring down the edges, then go up to 1480 F again to fuse the crack back together. But, this time, I'm slowing down the annealing schedule and holding for a bit longer, because that, I think was the culprit. I used the smaller kiln (Paragon Fusion7), and did not hold my poor plate at 1050 F for long enough.
Hopefully, that will solve my problem, 'cuz I'm getting tired of seeing breaks:(

Tuesday, April 15, 2008

"Rocky Road" Dip Dishes

I am officially unveiling my newest series of dishes, the "Rocky Road" dishes.
Made up of several cut pieces of glass in browns, reds, and vanilla. This series is very time consuming to produce, but I absolutely LOVE the results!

"Meet the Baby" Shower

Yea! I finally got to meet my baby niece, Adi! We had a fabulous open house, "Meet the Baby" shower for her, where the most popular game was, "Pass the Baby!"
She's so cute, I can't stand it!!
And, of course, we had a great spread to munch on for the virgin voyage of dad's plates:)

Monday, July 16, 2007

For Jacqueline and Christopher...


My friend, Jacqueline, is getting married in a few weeks and her cousins just threw her a wedding shower this last weekend. So, I checked her registry and got creative. This olive oil and serving tray set are the offshoot of a couple of items from her registry, but with a personal touch. I love the mold for this plate, and I am very happy with how the set turned out. But, better yet, gauging by her reaction, I think that she loves it as well.
And that makes me feel even better about it:)

Monday, May 7, 2007

Happy Anniversary, Mark and Lindsay!

Our friends Mark and Lindsay got married last year, but at the time, we had no idea what to get them. So instead of just getting something for the sake of getting something, we opted to wait until inspiration hit. And Wow, did it hit.
Check out the spread on this plate!


I have fallen in love with the Spectrum 96 glass that I've been working with lately. It does all the work, and I just cut!
However, the plate would have been entirely too naked presented all by itself. So, Todd and I went to Rainbow Coop in San Francisco to pick up some wonderful cheeses to accompany the tray.
I have to say that it was very difficult to pick a favorite, they all had their own appeal.


On the top left side of the platter is a Vermont, Taylor Made Farms Maple Smoked Gouda, sweet and milder than hickory-smoked gouda.
Top middle is the Welsh Red Dragon, a smooth, firm Cheddar made with Welsh brown ale and mustard seeds.This cheese is buttery and a bit spicy.
On the top right side of the platter is a Dutch Delft Gouda, a cow's milk blue cheese that was slightly crumbly but still a bit creamy.
We had an Ubriaca del Piave (from Bellunao, Italy) a couple of months back and it was wonderful. However, it is only on the market for a few months. So, when we asked for Ubriaca this time, we were guided to the Drunken Goat Cheese from Spain.
It is washed with wine as it ages.
The Carr Valley Mobay sits in the middle of the platter at bottom and is made in two halves with grapevine ash in the center. One half is made with goat’s milk, the other with sheep’s milk.


Nestled in the middle is a spicy hot, organic, Springhouse Cheese Co., Mike's Firehouse Curds from Petaluma, California, flavored with jalapenos, red peppers, parsley and cilantro. At the bottom right of the platter is the Belgian Chimay Bier cheese, which has the consistency of a soft brie and is washed with Chimay beer while it is aging.

As we assembled the plate, we decided to add some dried fruit: Bartlett pear, mango, gogi berries, hunza berries, cape gooseberries and rainier cherries.

To accompany the cheese plate, I fired an oil and vinegar tray and a smaller salt dish. We also filled a 375-mL wine bottle (that I etched with a bamboo pattern) with an extra virgin manznilla olive oil. For salt, we gave them some Black Lava Salt and 'Alea Pink Salt from Hawaii.

All in all, I think it makes a wonderful gift! I hope they were even half as excited about the whole thing as I am:)

Sunday, April 22, 2007

I Love My New Dip Dish!!!


Fresh out of the kiln, I'm so happy with the way this dish turned out.
For before pics, check out this post.
Notice how the red glass struck (turned color with the heat) to a bright orange.

Friday, April 20, 2007

New Plate! and I may be close to finishing...

My final project from Intermediate Glass is going in the kiln within the next few days! Finally!
There's been a huge line-up at the kiln for a few months, but it's time... Soon, this piece,

will be totally altogether as one. I'll photograph that as soon as I have it:0)

And these lovely pieces below...
at top : the mold,
the bottom layer of glass in in the middle, and the top layer of glass at bottom.

Also, I assembled a new dish to full fuse. I'll have it out of the kiln and then back in for a slump firing which will give it its shape. I will post those as soon as it's done as well!

Wednesday, April 18, 2007

New Plates and Paperweight...


I DID IT!!!

I went outside on this beautiful day, in the sunny Napa Valley, and took these shots of my newest projects:

This is the fused paperweight I made in February during Bryan Northup's class at M.Mitcavish Glass Studio "Pattern Bar & Kiln Casting."

Kiln casting is the technique. We used firebrick and carved out a design, which we then filled with pieces of glass, including some of the pattern bars.

These are images of the plate I worked on in March, in Intermediate Glass at M.Mitcavish Glass Studio. We created a cut sheet first, which are the three pieces in the middle picture. Then, I surrounded it with the teal green and transparent purple pieces before fusing it together. Finally, it was slumped into a mold to give it the shape.The lovely fruit bowl (at the moment) set is Spectrum 96 COE glass. It's beautiful splotches are the big attraction to this series of glass. I've been working on some cheese plates, with accompanying oil & vinegar dishes to create matching sets. I even created my own mold for the O&V plate!


On my way to the studio...

Yesterday, I finally finished cutting all the pieces for my Frank Lloyd Wright window that I'm working on for the studio. Yea! I'll remember to take my camera today, I hope, so that I can get some pictures up here!

Today, I want to go and play with glass and make some plates and bowls with the new molds that Michele picked up down in Vegas, baby!

Oh, and, if I remember this as well, I've got some plates sitting around that I've been wanting to get online as well. I'll go get that done right now! See you soon!

LinkWithin

Related Posts with Thumbnails