Showing posts with label kilnformed glass. Show all posts

Wednesday, July 10, 2013

artVenture 2013 - Girl Scouts and Fused Glass

Getting started - talking about how glass is made.
This year's artVenture took place once again at Architectural Glassarts in Lincoln, Nebraska. Thanks again to Rod Scott for his generosity in offering up his space!
We started out talking about how glass is made, how it comes to the glass shop, how to cut it and what happens after it goes in the kiln.  After the girls piece together the glass to create their design, the plates go into the kiln for an initial fusing that makes all the separate pieces into one. Then, the flat pieces go back in the kiln to get slumped into a mold. When, they come out of the kiln after the second firing, they have taken on the shape of the mold. Each group was given glass that was pre-cut to match the molds on their table.  We broke into groups and started brainstorming themes for our pieces. 
"Cold Blaze"
6.75" x 14.5"
Artists: Kaity, Jessie, Haley

Kaity, Jessie and Hallie created "Cold Blaze," a combination of an underwater scene under a blazing sunset. Can you see the fish, turtles and sea plants?

"Four Seasons"
set of four: 5.75" x 5.75"
Artists: Belle, Emma, Carrie

Belle, Emma and Carrie came up with a seasonal theme to go with the four molds they were presented. Clever, huh?

"Sunsets"
8.5" x 8.5"
Artists: Paige, Anna, Hallie
Paige, Anna and Hallie created an abstracted sunset for their piece...

Part sheets created for "Fireworks"
Artists: Noa, Laci, Krista, CJ, Jenny, Madison
...which leaves the last and largest group. This group of 6 were given glass blanks, but no mold. Generally, I coach the girls as they make their collaborative pieces which are donated to the artVenture auction. Additionally, I submit a piece of my work to be auctioned. This year, I wanted to try something different for the last piece. So, the girls made the blanks that would be cut up to become a larger panel that was pieced together and framed by me. I wasn't sure how they would react to the suggestion that they would make something specifically so it could be cut apart again. However, I think the fact that they don't get to keep the collaborative piece anyway really helps. (All the girls do get the chance to make fused glass pieces to take home. This year they all made 4"-6" plates and jewelry pieces.)
"Fireworks"
26" x 10.5"
Artists: Noa, Laci, Krista, CJ, Jenny, Madison
Pieced together by Carrie Strope Sohayda
I absolutely love how the panel turned out and once again all the girls made fantastic fused glass art!

Friday, March 29, 2013

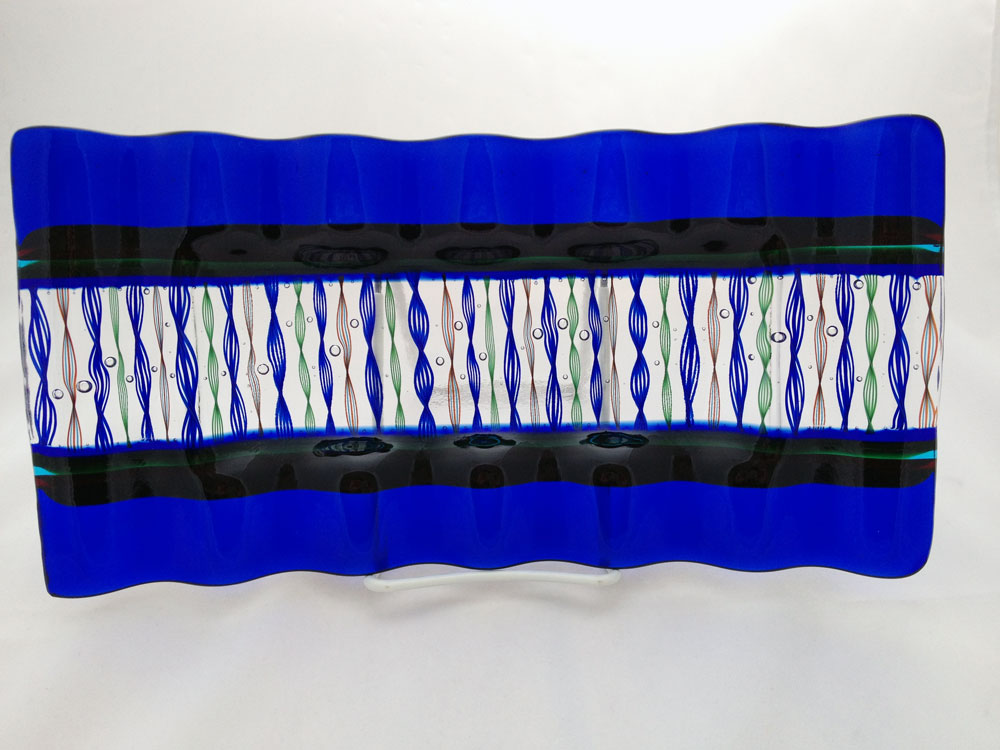
Undersea Gardens Plate Using 96 Cane and Sumpy's New Ripple Swoop Mold


Carrie Strope Sohayda ~ "Undersea Gardens" 12" x 6"
Materials:
  • 1/4 lb 96 Fusing Canes Alternating 3 Red 2 Aqua Inner Helix
  • 1/4 lb 96 Fusing Canes Green 5 Line Inner Helix
  • 1/4 lb 96 Fusing Canes Cobalt 5 Line Inner Helix
  • Spectrum System 96 Dark Blue Transparent
  • Spectrum System 96 Clear
  • Spectrum System 96 Cherry Red Transparent
  • Spectrum System 96 Medium Green Transparent
  • Spectrum System 96 Deep Aqua Transparent
  • Slumpy's SM-6130 Ripple Swoop Mold
  • HoneyDoo Zuper Glue 
Tools:
  • Mosaic Nippers
  • Fine Tip Sharpie
  • Ruler
  • Glass Cutter
  • Running Pliers
  • Safety Glasses
  • Kiln
  • Papyros Shelf Paper
  • Kilnwashed Kiln Furniture
1. Begin by cutting glass and nipping cane.
•Cut two 2” x 12” and two 1½” x 12” pieces of clear glass.
•Cut two 1½” x 12” pieces of dark blue glass.
•Cut two ⅜” x 12” strips each of dark blue, cherry red, medium green, and deep aqua.
•Mark fusing cane at 2” lengths. Using mosaic nippers, cut fusing canes in each color to 2.”

2. Layout pieces according to pattern.
•For the first layer, lay down smaller piece of clear glass in the middle. On either side, place the
strips of glass on edge, and then lay down the  dark blue pieces of glass to the outside.
•For the second layer, place the two remaining pieces of clear glass on top of the dark blue, and lay the cane out across the clear piece in the middle, securing the outer pieces with a dab of glue.

TIP: If you build on a piece of cardboard, you can easily transport and load the pieces into the kiln.

3. Full fuse & then slump.

Pattern Alterations: •To eliminate strips, add ½” to
the width of the dark blue and clear rectangles.
•To avoid using kiln furniture or fiber paper dams,
cut two ½” x 2” pieces of dark blue & clear to hold
the fusing cane in the middle section.
FIRING TIPS:
•To prevent the fusing cane from shifting off of the base layer of glass while firing, use kiln dams
against the ends. If you don’t have dams or fiber paper, you can alter the pattern using the above
instructions.
•If you want to eliminate bubbles from between the canes, space the canes so that there is a little
wiggle room between the pieces.


Suggested full fuse firing schedule:

200 dph to 1000ºF hold for 45 min
50 dph to 1250ºF hold for 25 min
500 dph to 1450ºF hold for 45 min
full to 1000ºF with no hold
200 dph to 950ºF hold for 60 min
100 dph to 800ºF with no hold
300 dph to 120ºF  with no hold

NOTE: This is a fairly conservative firing schedule, but you may need to make changes based on your kiln.

Wednesday, April 11, 2012

Affairs of the 'Art at Noyes Focus Gallery in April


I'm an associate member at the Noyes Gallery in Lincoln, Nebraska, where I have lots of glass jewelry to peruse. But this April, I'll be joining six other artists in the Focus Gallery! That means I'll have some larger pieces available!
Thanks to Doug for the pedestals

LinkWithin

Related Posts with Thumbnails