Showing posts with label how to. Show all posts

Monday, September 16, 2013

Lotus Mosaic Mandala Pattern

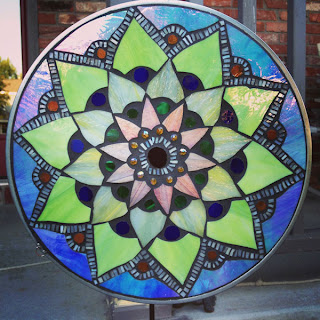
Lotus Mosaic Mandala Modification in Purple, Amber, & Blue
My lotus mosaic mandalas have been getting a lot of attention lately, which is awesome! I love making these glass on glass mosaics. I've got them at two local shops in Lincoln, Nebraska: Out of the Box and Architectural Glassarts; and coming soon to Flowing Stone Art Gallery in Beatrice, Nebraska.
Lotus Mosaic Mandala in Blue, White, Yellow & Green
If you'd like to commission a mosaic mandala, I would love to make it for you! Just contact me with your ideas (colors, size, etc.) HOWEVER, maybe you want to make one for yourself? I've had a request for the pattern and instructions, and since I love teaching others, I've made it available for purchase on my etsy site. Or, again, you can just contact me!

6 page instruction booklet that comes with pattern, full of links, sources & resources
6 page instruction booklet that comes with
pattern, full of links, sources & resources
For $15, you get a full size 14" pattern of the layout for the lotus mosaic mandala and six pages of instructions! This pattern has modifications for beginners to advanced glass cutters and mosaicists. Enjoy!

Lotus Mosaic Mandala in Pastels
Testimonials:

From a previous student, Debbie: "Anyone who wants to learn from an excellent glass art instructor should check out Carrie's wealth of information that she shares with the public via her youtube videos, her blogs, and the various classes she teaches throughout the US. I have never been so impressed with another teacher's preparations and willingness to share and educate other glass artists or want to be glass artists. I met Carrie several years ago when she had been volunteering as an aide in a glass studio I started taking classes at. She was always trying new techniques and trying to learn all she could then, but it is very apparent that Carrie's dedication has made her someone to watch in the glass community. She is a true inspiration, and although she is many years my junior, I aspire to be just like her when I grow up! ; ) I wish she were still here in Napa, but honestly, anyone pretty much anywhere can benefit from her passion for glass. Carrie does nothing half (gl)ass...I recently was admiring her stained glass mandalas and asked her if she might be willing to sell the pattern. Carrie was more than willing to sell her pattern and sent me via email an incredibly detailed 6 page instruction pack with links of her youtube videos, as well as supply sources. The pattern is on its way to me now, and I know that should I need any help, she's just a click or two away. Carrie you ROCK!"

Another mosaic artist:
"Thanks, Carrie. And I always enjoy talking to you and watching your demonstrations at the Las Vegas Glass and Bead Show. You definitely know your stuff!"

Thursday, September 5, 2013

Wrapping a Glass Base with Zinc Edge Came


Several people have asked how I attach the hangers to my Glass on Glass Mosaic Mandalas.
So, here is a "short" 20 minute video lesson that describes the process. Enjoy!


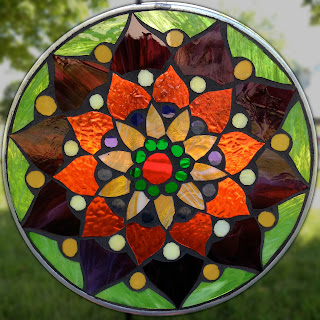
Red, Amber and Violet Lotus Mosaic Mandala
View more mandalas at calyxann.etsy.com!

Friday, March 29, 2013

Undersea Gardens Plate Using 96 Cane and Sumpy's New Ripple Swoop Mold


Carrie Strope Sohayda ~ "Undersea Gardens" 12" x 6"
Materials:
  • 1/4 lb 96 Fusing Canes Alternating 3 Red 2 Aqua Inner Helix
  • 1/4 lb 96 Fusing Canes Green 5 Line Inner Helix
  • 1/4 lb 96 Fusing Canes Cobalt 5 Line Inner Helix
  • Spectrum System 96 Dark Blue Transparent
  • Spectrum System 96 Clear
  • Spectrum System 96 Cherry Red Transparent
  • Spectrum System 96 Medium Green Transparent
  • Spectrum System 96 Deep Aqua Transparent
  • Slumpy's SM-6130 Ripple Swoop Mold
  • HoneyDoo Zuper Glue 
Tools:
  • Mosaic Nippers
  • Fine Tip Sharpie
  • Ruler
  • Glass Cutter
  • Running Pliers
  • Safety Glasses
  • Kiln
  • Papyros Shelf Paper
  • Kilnwashed Kiln Furniture
1. Begin by cutting glass and nipping cane.
•Cut two 2” x 12” and two 1½” x 12” pieces of clear glass.
•Cut two 1½” x 12” pieces of dark blue glass.
•Cut two ⅜” x 12” strips each of dark blue, cherry red, medium green, and deep aqua.
•Mark fusing cane at 2” lengths. Using mosaic nippers, cut fusing canes in each color to 2.”

2. Layout pieces according to pattern.
•For the first layer, lay down smaller piece of clear glass in the middle. On either side, place the
strips of glass on edge, and then lay down the  dark blue pieces of glass to the outside.
•For the second layer, place the two remaining pieces of clear glass on top of the dark blue, and lay the cane out across the clear piece in the middle, securing the outer pieces with a dab of glue.

TIP: If you build on a piece of cardboard, you can easily transport and load the pieces into the kiln.

3. Full fuse & then slump.

Pattern Alterations: •To eliminate strips, add ½” to
the width of the dark blue and clear rectangles.
•To avoid using kiln furniture or fiber paper dams,
cut two ½” x 2” pieces of dark blue & clear to hold
the fusing cane in the middle section.
FIRING TIPS:
•To prevent the fusing cane from shifting off of the base layer of glass while firing, use kiln dams
against the ends. If you don’t have dams or fiber paper, you can alter the pattern using the above
instructions.
•If you want to eliminate bubbles from between the canes, space the canes so that there is a little
wiggle room between the pieces.


Suggested full fuse firing schedule:

200 dph to 1000ºF hold for 45 min
50 dph to 1250ºF hold for 25 min
500 dph to 1450ºF hold for 45 min
full to 1000ºF with no hold
200 dph to 950ºF hold for 60 min
100 dph to 800ºF with no hold
300 dph to 120ºF  with no hold

NOTE: This is a fairly conservative firing schedule, but you may need to make changes based on your kiln.

Friday, April 20, 2012

Frit Mandalas Using Glassline and No Days Liquid Fusing Adhesive

If you're interested in purchasing the plates below, they're currently for sale at the Noyes Art Gallery in downtown Lincoln through the month of April. After that, perhaps I'll list them on Etsy. Contact me if you're interested.
Ready to fire in the kiln
No Days Liquid Fusing Adhesive can be used with frits to easily create complex designs. In this set of Mandala plates, I've added Glassline Pens to the mix to add extra layers and dimensionality.
Base layer of clear becomes the clear cap

Thursday, April 12, 2012

How to Make Dichroic Purse Hangers

Materials:
Assortment of System 96 dichroic from Slumpy's
Slumpy's new bracelet finding, and Aanraku key fob and purse hanger
No Days Bailbond and a heat gun

Tuesday, August 2, 2011

Jim Flora's "Chance Encounter" in Glass

Thought I'd share the video I finished a week or so ago. I watched it again tonight, and I think it turned out pretty well!


It's a fairly concise description of the whole fused glass process for making a slumped platter with frit. So, if you're curious...check it out!
:)

Chance Encounter (1970)
by James Flora (1914-1998)
www.jimflora.com
used by permission

http://jimflora.blogspot.com/
http://www.etsy.com/shop/jimflora

Wednesday, May 4, 2011

Making Fused Glass Globs

Begin by cutting strips of fusible glass:


You can use mosaic nippers to cut some strips into single layer squares for smaller globs.


Stack other squares into two and three layer stacks and place on a prepped kiln shelf.


Fire the glass squares up to 1500 degrees Fahrenheit and hold for 8-10 minutes.
In a small kiln (like my Caldera), I go AFAP (as fast as possible) to 1500 and hold for 10 minutes, then the next segment of the firing schedule is off. The kiln holds enough heat, and they are small enough that I'm not worried about thermal shock. Plus, I'll be firing these again in a larger project. They'll really anneal in that piece.

Saturday, January 22, 2011

Attaching Bails with No Days BailBond

Curing BailBond in an Oven
After I finish with a dichroic glass tile project, I end up with a bunch of cabochons that are awaiting bails. However, I HATE using two-part epoxy and adhesives, in general. That is...until I discovered No Days BailBond. It's a heat set adhesive. There's no mixing noxious chemicals and it's easy to clean up. PLUS, if I decide that I need to change out a bail or use the cabochon as a purse hanger instead of a pendant, I can switch the findings just by reheating! (This versatility really appeals to me, as apparently I have a hard time with commitment...it took me 2 years to get married after getting engaged, and another two years to decide that I could change my name!!)
Anyway...when I have a bunch of pieces that need findings, here's what I do:

1) Secure bail to pendant.

Cut a piece of BailBond to fit the size of your bail. For this pendant, I used a piece of BailBond approximately 3/8” long. Sandwich the BailBond between the pendant and the bail, and then
secure in place with painter’s tape. The tape prevents the bail from moving in the oven once the BailBond has melted.

2) Place the pendants in the oven.

I used my toaster oven for this demo, but a regular oven may be used, as well. For ease of transport, you can place several bails on a cookie sheet. Place the cookie sheet and pendants in a room temperature oven and set it for your curing temperature. I had to set my toaster oven much higher (300 degrees F) than the melting temperature of the BailBond (160 degrees F). In a traditional oven the temperature may only have to be set at 200 degrees F. It's recommended to do a test run to figure out what temperature to set your oven to.

3) Let the BailBond fully adhere to the bail and glass.


Once the oven reaches 200 degrees F, leave the pendants for 10 minutes to let the BailBond melt to the bail and the pendant. It’s important that both the bail AND the glass are hot enough for
the BailBond to fully adhere. You can peek in the oven and actually see the BailBond melting
between the bail and pendant.

4) Let the pendant cool and clean up.

After the pendant has cooled, carefully remove the tape. If there is any
residue from tape, it can be scratched off with your fingernail, or rubbed off
with your fingers (a little olive oil helps). If the BailBond has melted out
from under the bail, an exacto blade will help to remove it. (I was able to
scratch off the excess with my fingernail while the piece was still warm.)


Now, your pendants are ready to wear! The only thing that you want to be aware of when using the No Days BailBond is that because it is a heat set adhesive, you don't want to leave it in your car on a hot, sunny day.

My Very First Mesh Melt...

I've been wanting to try this technique for ages, and well...I finally found the time to pursue it.
My uncle picked up a stainless steel rack from Bed, Bath and Beyond and some stainless steel wire from the local hardware store. He wired the rack for me, and I stacked it in the kiln.


I've got a good 5-6 coats of Bullseye kiln wash on my shelf, and brushed a bit of kiln wash on the posts as well, just in case the glass ends up going further than I had planned.

I didn't put much glass on the rack, as it's the first time. I'm just curious to see what kind of pattern I'll get with the lines on the rack. I fiddled with a couple of firing schedules I found at Clearwater Glass Studio and FusedGlass.org.

At around 1460, I opened the kiln to see the glass just beginning to fall through the rack, resembling taffy, or that ribbon candy.

[Warning: When you open the kiln at higher temperatures, you need to wear UV protective eye wear, and high temp gloves. Cotton clothing is also less likely to ignite than synthetics.]

When I checked the glass again at 1680 degrees, most of the glass had fallen through to the shelf. Only strings of glass remained on the rack, so I decided to call it good, interrupting my schedule to skip to the next segment of my firing schedule.


It is likely that for this reason, when I opened the kiln, there were shards of glass EVERYWHERE! The high temperatures warped the wire rack, so if I were to do the melt again, I would use kiln posts to support the sides.

However, I am very satisfied with the results of this first mesh melt. The photo below shows the back side (against the kiln shelf) of the glass at top, and the top side of the melt at the bottom. Hmmm...that's a bit confusing, huh?


Bottom side of mesh melt.
Top side of mesh melt.

(Note that none of these photos show the glass hot inside of the kiln. Maybe next time...)

For anyone wanting a hard copy of the mesh melt, or even the pot melt techniques, Brenda Griffith has a great introductory kilnforming / glass fusing book:

How to Make Layered Dichroic Jewelry - Part 2

This post is a continuation of a tutorial on layering dichroic glass to make gorgeous fused glass jewelry. For the first part of the tutorial, check out this post...

So, the layered dichroic tile came out of the kiln and looks wonderful. I usually let it sit for a few weeks so I can enjoy the full effect of all that sparkle :)


After I've got an eyeful, it's time to think about cutting this baby down to size. I want a bunch of pendants, but the cabs you'll create by cutting the tile down work great for rings, purse hangers, mosaics,...you name it!

I've begun to cut my dichro tile down a bit... I just use a regular glass cutter (my preferred cutter is my Toyo pistol grip, no oil necessary). For the first few cuts, you need to remember that:
A) This tile is thick! All the layers fused together have made this tile about 1/4" thick. Thicker glass is tougher to break.
B) When scoring glass, stress can build and fracture the glass at unforeseen points if you're trying to break off too little.
The beginning tile was about 4" x 4." When I attempt to score and break my glass, I don't try to take off less than an inch, initially. Once your pieces start to get smaller, it's easier to cut them down into smaller and smaller pieces, to a point.
When breaking the glass initially, a regular pair of running pliers doesn't really work. IF you can squeeze really hard, the tile MIGHT break. The tools I use to break the tile are:

1) A hammer - you can tap lightly on the underside (opposite side of your score) of the tile all the way along your score. Eventually, the piece should knock off where you asked it to. Sometimes, you will be surprised. This gets harder to do as the pieces get smaller. But, by that point, you can switch to your running pliers.
2) The Morton Glass Works Safety Break M-80 Tool - I was able to use this for the very first time on the thick tiles last Saturday. You have to squeeze fairly hard, but it breaks really well! The Morton website has some really great videos that make cutting glass look like a breeze.
3) Diamond Blade Saw - If you've got access to a wet tile saw with a diamond blade for cutting glass, you can make very accurate and exact cuts. If it's a ring saw, you can even cut custom shapes. This is a costly tool, but you can sometimes have the local stained glass / fusing shop cut the tile for you, or even show you how to cut it for yourself.


If you're not crazy about the raw dichroic on the edges of the tile, you can nip them off with mosaic nippers. These pieces can be piled together when you put them back in the kiln and will form a puddly cabochon with lots of sparkle.


Once you've finished cutting all of the pieces, it's time to put them back in the kiln.

Each kiln is going to fire a bit differently. This is just a recommended firing schedule, and I'm using my "Little Miss" Caldera kiln with a 6" shelf.


For a nice, clean edge that holds the shape of the cut, you'll fire to approximately 1420 degrees F and hold for 5 minutes. Since my studio is really cold right now (we're in the middle of a blizzard), I slowed the ramp up to 500 degrees per hour to 1000; then continued AFAP (as fast as possible, or 9999) to 1420 and held for 5 minutes. Follow this segment with your annealing schedule back down to room temperature.

This schedule will soften the edges without globbing out of shape.


For my scrap bits, I'll throw those in the kiln AFAP all the way to 1480 for 8-10 minutes. I want these pieces to be rounded and full fused. They're all really small pieces, too. So, they won't shock from the heat on the way up.

Look for my last post in this series on attaching the bails with No Days BailBond...

Thursday, November 4, 2010

How to Make Layered Dichroic Jewelry - Part 1

Tonight, I'll be giving a quick demonstration of some of the upcoming classes I'll be teaching at Architectural Glass Arts (1 block South of 48th and Prescott) here in Lincoln, Nebraska. In particular, there's been a lot of interest in the Dichroic Tile for Jewelry class. It's a great way to make a bunch of gifts all in one go, because you start by making a 4" x 4" layered dichroic tile and end up with 10-20 pieces for jewelry (depending upon how large or small the pieces are that you decide to cut the tile into).
So, without further ado, here's part one (in the kiln prepping for part 2 as we speak)!


First, you'll need to gather your supplies:
You'll need your cutting tools (glass cutter, running pliers, mosaic nippers), a pair of tweezers come in handy for moving small pieces around, 5" x 5" piece of ThinFire paper (if you're not building directly on the kiln shelf like I did) on a sturdy piece of cardboard, your favorite brand of fusing glue (I'm using No Days Liquid Fusing Adhesive), cleaning supplies (I use Sparkle brand glass cleaner and microfiber cloths), and of course, glass.
You'll need a variety of dichroic bits on black and clear. You can actually purchase sample kits or assortment bags from several dichroic suppliers, and I've found this to be the best way to build up a variety of different dichroics at a good price.
Lastly, you'll need either: 4" x 4" piece of thin black (or whatever color you want to be the base layer) AND 4" x 4" piece of thin clear, OR a 4" x 4" piece of clear. If you're using thins, just follow the steps below verbatim. Otherwise, you'll need to start by laying out your ThinFire on cardboard and drawing a 4" x 4" square on the paper with a pen or pencil. This square is where you'll start layering your pieces.

Now, it's time to assemble the layers:

Begin by placing your thin black on the kiln shelf. (Alternately, you may use ThinFire paper setting atop of a sturdy piece of cardboard. After the glue has dried, it is easy to scoot the paper off of the cardboard and into the kiln. DO NOT FIRE THE CARDBOARD!!!


[Note: If using standard thickness (1/8") glass, then you should not have a base layer. Instead, mark your kiln shelf with a 4" x 4" square (lightly use a pencil to mark the primed shelf), or draw a 4" x 4" square on a piece of ThinFire paper on sturdy cardboard. You will not use a base layer of glass. Your base layer will be your dichroic on black pieces.]
Now it's time to play with dichro!!! First, you'll be laying down bits of opaque dichroic glass. (Dichroic glass comes on black thin glass or on clear thin glass.) Cut the dichroic pieces into random shapes, squares, triangles, strips...whatever you feel! Trust me, as long as you load the dichro up, you'll be pleased with how this turns out.
I included a wavy stick of dichro and some flameworked twisty stringers. The only thing I would not recommend is to use plain old glass. I've tried it once and it overpowered the dichro. It's a mistake I will not try again!
You can see bits of my base glass that are naked. They will likely show up in the final piece, depending upon how well I cover those bits with clear dichroic in the next step.


If you haven't used a base layer of glass, then you need to use more dichroic than I did. You should not be able to see the kiln shelf or ThinFire.
At this point, I also dropped a bit of glue in the seams, especially along the edges of the glass. Even though the glass is placed fairly randomly, it takes some time to do. I don't want my nicely stacked piece to shift around before I get it in the kiln!

Now, you start layering clear dichroic on top of your opaque dichroic. A word of warning! The metal oxides that make that beautiful dichroic coating do not stick to each other when fired. What does this mean? It means that when placing the transparent dichroic glass on top of your opaque dichroic, you need to carefully examine each piece to make sure the dichroic coating is up and not down. I do this by holding my piece of glass to a light and trying to catch the reflection of the light on the dichro coating. If your dichro coating is face up, the light it reflects will run all the way to the edge of the glass. If your dichro coating is down, you will see a slight "shadow," kind of like when you stand really close to the bathroom mirror and look at the edge. (Anyone besides me ever done this?)
Make sure you have plenty of transparent dichroic on top of your base layer, but it's okay with this layer to go a little lighter than you did with the opaque layer. AND, some transparent dichroics will completely obscure the layer underneath them. So, don't get too crazy! (Boom, boom, ain't it great to be crazy?)


As I laid each piece of transparent dichro down, I put a tiny bit of adhesive on the bottom side. Like I said earlier, I use No Days Liquid Fusing Adhesive. It's got a pleasant orange aroma that helps to cover up the garage smell in my studio. It's also really tacky, so when it dries, my pieces are more stable than if I were to use different fusing glues. (Did I tell you how long it takes to put this piece together? Just long enough to make it really frustrating when pieces move before they are in the kiln!)
Tada!!! Made it to the kiln, and now all that's left is to cap it! Dichro is nice and sparkly, but when you put the clear layer of glass on top, it adds a really nice dimensionality to the metal coating. This is where I gently add the 4" x 4" piece of thin, clear glass on top before firing up the kiln. [NOTE: If using standard thickness glass, you didn't have a base layer. However, you definitely want a clear cap. So, this is where you would add a 4" x 4" piece of clear to your lovely stack.

Load the kiln and fire!
The firing schedule will vary from kiln to kiln. But, for my small Paragon Caldera kiln, this is the schedule I used:

500 degrees per hour to 600 degrees and hold for 15 minutes

(I didn't let my glue thoroughly set and dry. The No Days adhesive starts to set within 3 minutes, but can take much longer to dry - even overnight. This step helps to dry and burn off moisture, so make sure the kiln is vented. I simply place 2 stacked squares of 1/8" thick fiber paper in two corners of my kiln and leave it vented the whole time.)


500 - 1000 - 5


The binders in the ThinFire and the glue will burn off completely during this stage. The kiln still needs to be vented...
full - 1250 - 10
This stage heats up to slump temperatures and let the layers fall together, squeezing out air bubbles and beginning to tack.
full- 1480 - 15

All the layers should now fuse together fully.
full - 900 - 20
Annealing temperature. My bitty kiln holds its heat well, and with small pieces like this one, it doesn't need any further annealing.
0000
The end.
Make sure you DO NOT open the kiln even to peek once the kiln is below 1000 degrees! You're just asking for trouble if you do. Don't want to put all that work into making this nice piece and then stress out your glass and make it shatter!!!
No, No, No!
Part Two will cover cutting the tile into smaller pieces, rounding off the sharp edges and attaching a bail.


Sunday, December 20, 2009

How it was made...Glass Holiday Paperweight

I'm in New Jersey visiting family, and helping to clear out the coffers! We're in the basement today photographing items for my mother-in-law so she can sell them. But, while I was taking pictures, she found this great holiday themed paperweight and I had to share it!

When looking at a paperweight to see how it's made, the first thing you look at is the underside of the paperweight. This allows you to see the layers of the paperweight and how it "grew", kind of like looking at the rings of a tree:

The underside of this paperweight shows us a first gather (The first bit of glass that was collected on the pipe as it was dipped into molten glass.) that was coated in white powder. A second gather (The glass on the pipe was again dipped into molten glass to encase the first bit of glass.) of glass was collected over the white ball, and then then piece was marvered (rolled and shaped) onto a pin frog (or the equivalent) to give it a bunch of pock marks where air could collect to form the many tiny bubbles upon the next gather of glass. At this point, the paperweight would look like a small, white, bubbly paperweight. But, this was just the background for the scene that was picked up (The holly leaf and berries were laid in powder on a steel plate "marver.") next.
After the powdered design was melted into the paperweight, it had to be shaped and another gather encased the design. Finally, a green wrap was created on a separate pipe and swirled onto the paperweight. But, that was only the last HOT step!
See all the facets? First, a nice polished flat bottom. Then, a nice bevel that allows the paperweight to sit with it's holly design pointed at you. BUT, you can't see the holly without a window carved in, as well! That's at least three (and more likely, four) different polishing pads for each flat surface!
To finish it off, an etched artist's signature...and Voila!
It's just that easy ;)

LinkWithin

Related Posts with Thumbnails