Showing posts with label kiln. Show all posts

Friday, March 29, 2013

Undersea Gardens Plate Using 96 Cane and Sumpy's New Ripple Swoop Mold


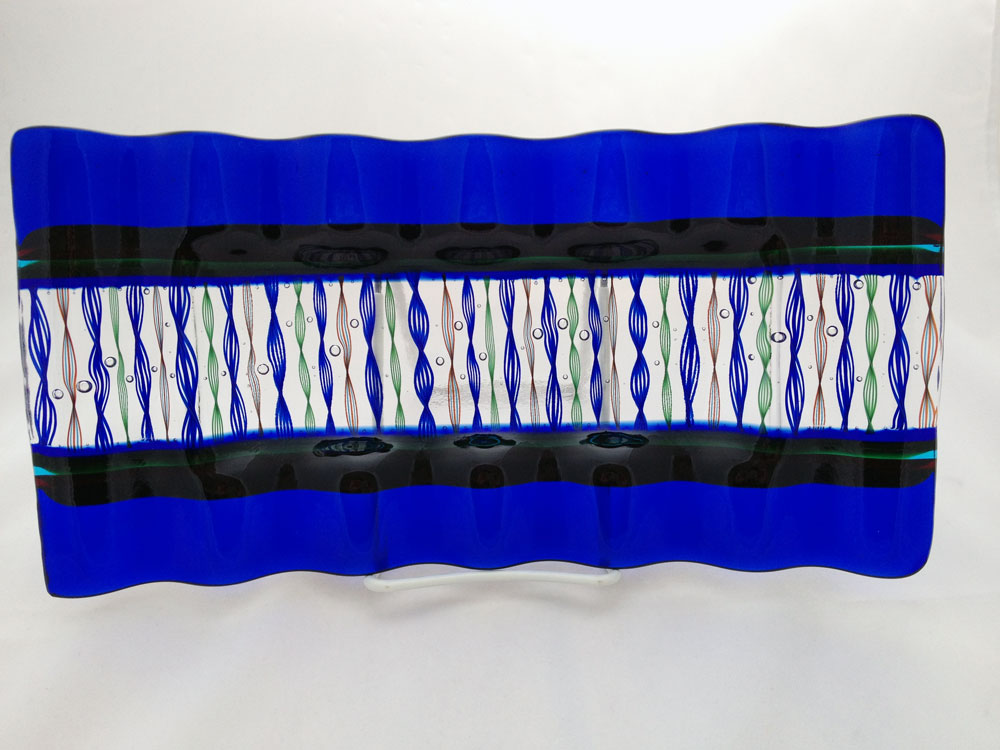
Carrie Strope Sohayda ~ "Undersea Gardens" 12" x 6"
Materials:
  • 1/4 lb 96 Fusing Canes Alternating 3 Red 2 Aqua Inner Helix
  • 1/4 lb 96 Fusing Canes Green 5 Line Inner Helix
  • 1/4 lb 96 Fusing Canes Cobalt 5 Line Inner Helix
  • Spectrum System 96 Dark Blue Transparent
  • Spectrum System 96 Clear
  • Spectrum System 96 Cherry Red Transparent
  • Spectrum System 96 Medium Green Transparent
  • Spectrum System 96 Deep Aqua Transparent
  • Slumpy's SM-6130 Ripple Swoop Mold
  • HoneyDoo Zuper Glue 
Tools:
  • Mosaic Nippers
  • Fine Tip Sharpie
  • Ruler
  • Glass Cutter
  • Running Pliers
  • Safety Glasses
  • Kiln
  • Papyros Shelf Paper
  • Kilnwashed Kiln Furniture
1. Begin by cutting glass and nipping cane.
•Cut two 2” x 12” and two 1½” x 12” pieces of clear glass.
•Cut two 1½” x 12” pieces of dark blue glass.
•Cut two ⅜” x 12” strips each of dark blue, cherry red, medium green, and deep aqua.
•Mark fusing cane at 2” lengths. Using mosaic nippers, cut fusing canes in each color to 2.”

2. Layout pieces according to pattern.
•For the first layer, lay down smaller piece of clear glass in the middle. On either side, place the
strips of glass on edge, and then lay down the  dark blue pieces of glass to the outside.
•For the second layer, place the two remaining pieces of clear glass on top of the dark blue, and lay the cane out across the clear piece in the middle, securing the outer pieces with a dab of glue.

TIP: If you build on a piece of cardboard, you can easily transport and load the pieces into the kiln.

3. Full fuse & then slump.

Pattern Alterations: •To eliminate strips, add ½” to
the width of the dark blue and clear rectangles.
•To avoid using kiln furniture or fiber paper dams,
cut two ½” x 2” pieces of dark blue & clear to hold
the fusing cane in the middle section.
FIRING TIPS:
•To prevent the fusing cane from shifting off of the base layer of glass while firing, use kiln dams
against the ends. If you don’t have dams or fiber paper, you can alter the pattern using the above
instructions.
•If you want to eliminate bubbles from between the canes, space the canes so that there is a little
wiggle room between the pieces.


Suggested full fuse firing schedule:

200 dph to 1000ºF hold for 45 min
50 dph to 1250ºF hold for 25 min
500 dph to 1450ºF hold for 45 min
full to 1000ºF with no hold
200 dph to 950ºF hold for 60 min
100 dph to 800ºF with no hold
300 dph to 120ºF  with no hold

NOTE: This is a fairly conservative firing schedule, but you may need to make changes based on your kiln.

Saturday, October 1, 2011

Date Night in Fused Glass at the LUX


Getting to know the glass...

Cutting and piecing everything in place


Thursday, February 25, 2010

Time to Tweak

I just finished my first "official" firing of my new Paragon Pearl 22 kiln.
It's been so long since I have fired a large kiln. I'm still missing a few things from the cross country move, and my log book with all the firing schedules is probably in the same box as the missing bracelet mandrel. (But, that's a whole different story.)
Here's the picture that I took this morning upon opening my kiln. I'm happy with how the designs turned out, but the firing schedule needs to be tweaked a bit. Each kiln fires a little differently.


The schedule that I used was tweaked a bit from the full fuse schedule at fusedglass.org (a great resource for glass artists, by the way).
After taking the pieces out of the kiln, there was still some texture; on the underside of one piece, and the top side of the other. At a full fuse, these two pieces should have fired fully and lost all texture. So, now I know for the next firing that I need to go to a higher temperature, and hold that temperature for a little longer.

Texture that shouldn't exist at a full fuse.

Back into the kiln the plates go, with some more designs that I've been working on. We'll see how the tweaked schedule works, and build on it as necessary.

Friday, May 11, 2007

Glass-making 101

From Stained Glass Step By Step, by Patricia Ann Daley:

I love this book for its plethora of information, from the process of making glass to types of glass to leading and foiling methods of assembly. The projects focus on different types of assembly. A list of projects includes: a Fleur de Lys Panel (
Lead Came Method), a Butterfly Sidelight (Copper Foil Method), a kitchen wall clock, a mosaic-ed vase, a six panel lamp, and an Alaskan Totem Light (Sculptural Element).

The first 10 page chapter tells about the process of glass making, as well as describes the different types of glass...

First and foremost, glass is a liquid. Mind you, it's a solid liquid, because it moves so slowly that we don't notice it. However, if you were to examine a large cathedral window that has been standing upright in the same position for many years, you would notice that at the bottom, the glass has flowed downward and become thicker.
Glass is made from silica sand with 1% iron, soda ash, limestone and borax, plus added metal oxides for color: dichrome=green; copper/cobalt=blue; cadmium=lighter reds, oranges, and yellows; gold salts=deep, rich reds, gold pinks and purples.
Generally, most glass that is on the market today is machine-made. The process begins with a carefully measured dry mixture that is place in a crucible, a large "bowl," and then placed in a furnace to slowly heat the mixture to white-hot temperatures. After reaching the high temperatures, the glass liquid is ladled onto mixing slabs where the glass is twirled with a two pronged fork, similar to the way salt water taffy is twirled to mix it. The color changes to a bright orange and the consistency resembles taffy as the glass begins to cool.
The glass is now ready to be rolled, and this is the point where it is textured. The bottom roller gives the texture to the glass and is engraved with the texture. For standard glass, the thickness is now at 1/8" and the color of the glass mixture becomes a dull orange/red as it has cooled even more.
At this point the glass enters the annealing lehr, a conveyor line that slowly cools the glass by moving it from the hottest end of the "oven" to the cold, room temperature side. The glass is ready to be cut and packed into crates for distribution.


Thursday, May 10, 2007

Bullseye's e-merge 2008

"A juried kiln-glass exhibition for emerging and intermediate-level artists"

Yowsers! Talk about exciting news! Bullseye has announced its juried contest for 2008.
From their postcard:

"e-merge 2008, the fifth in a series of juried kiln-glass exhibitions, aims to recognize students, early-career artists, and those artists not regularly represented by the top-flight national and international galleries...e-merge 2008 is your opportunity to compete for $5,750 in awards and representation in a full-color catalog documenting impressive kilnwork by the rising talents in the field."

The great part about this announcement is that the submission deadline isn't until February 22, 2008. Plenty of time to implement those great ideas that have been brewing!

For more information, check out the Bullseye website at www.BullseyeGlass.com/emerge.

LinkWithin

Related Posts with Thumbnails