Saturday, August 7, 2010

deLUX Art Gala auction preview


Click the picture to see the whole album of donated art on Picasa.

The 2010 deLUX Art Gala benefit dinner and art auction is right around the corner! Check out all the great pieces donated by local artists to support the LUX Center for the Arts. Grab your tickets on the LUX's website, or call 402.466.8692.

Tuesday, August 3, 2010

August Newsletter

*

Lincoln Arts Fest Preview

Calyx Glass


“What’s in the Kiln?”

August 2010 Newsletter

deLUX Gala piece in progress

Upcoming Classes

(Refer a friend and receive a 10% discount on classes offered in my studio. Make sure your friend mentions your name when they sign up! - offer not available for classes offered at the LUX Center for the Arts.)

*Fused Glass Sun Catcher for Parent and Child - This is a perfect class for kids to make a personalized gift, or just to learn to (carefully) play with glass while spending some quality time with mom or dad.
Sunday, August 22, 10am-noon
Saturday, August 28, 10am-noon
Sunday, October 24, 10am-noon
*Soldered Pendant and Jewelry - Learn to make personalized, decorative, keepsake lead-free soldered glass jewelry pendants in this afternoon class. We will experiment with adding decorative wire work, and Swarovski crystal dangles to dress up the pendant.
Saturday, August 21
10am-1pm
*Sampler Platter Class - Explore different materials used in glass fusing including dichroic glass, glass paints, fusible paper, powders, frits, and stringers in this new class being offered at the LUX Center for the Arts this fall!
Sept. 21 - Nov . 2 (no class Oct. 19) 6:30pm - 9pm
Call Natalie Nelson at 402.466.8692 to register.

Upcoming Events


2010 Lincoln Arts Festival

Saturday, September 25 from 10am – 6pm

Sunday, September 26 from 10am – 5pm

South Pointe Pavillions(27th & Pine Lake Road)


Come by to say hi, and check out the new pieces I’ve been working on specifically for this show!

There will be live music, art and artists from around the country, children’s activities, food and raffle prizes.


Nebraska State Fair

August 22 - September 6


I’m anxious to see what kind of glass Nebraskans are showing at the fair! I’ll be showing my Nebraska Prairie Stained Glass Window along with a bunch of fused and kiln cast glass. Check it out!


deLUX Art Gala

September 19, 4:30 pm

Grand Manse (129 North 10th Street)


See my auction piece in the flesh and support the arts in Lincoln at the LUX’s benefit dinner catered by Venue and art auction.


Remember Me?

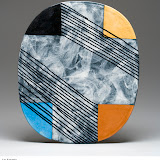
“Patchwork Platter,” 9.25" x 5.5"

Yea! I won third place!


My other piece, has yet to be properly photographed, but I can now unveil it for you here:

This piece was inspired by the fused glass artwork of Kim Brills and as such was a dedication to her. I interpreted the bottom fused plate as an aerial view of a city map of Austin, TX. So, I decided to reflect it upwards into an image of the skyline of Austin, separating the flat fused plates by a cast glass wave representing Lady Bird Lake ( a reservoir of the Colorado River in downtown Austin). The finishing touches of this piece butted right up against the deadline for dropping it off at A to Z Printing for hanging!

The show continues for the remainder of August. So there’s still time to swing by and see the Lincoln Artists’ Guild 90th Anniversary show, if you haven’t had the chance yet.


Well, I need to take a shower and get packed for Sturgis, SD! It’s going to be a busy couple of months; find me on facebook to keep up with my travels!


Thanks for reading and feel free to forward this on to your friends!


Carrie Strope


Recently created sun catchers from classes

Sale for this month: Receive a 10% discount on any purchase from my Etsy shop.


Purchase the item making sure to mention “August Newsletter” in notes to seller. Then, wait to receive a revised invoice by email. Pay as usual (through PayPal), and I will send your item as soon as payment posts!


Tuesday, July 27, 2010

What is Dichroic Glass?

dichrotic...dichronic...dichro...dichroic glass...

People are fascinated by sparkly, and if it's glass, then dichroic is your mega sparkle!
But, there's a lot of confusion about what dichroic glass is...

Some pins I have created with dichroic accents.


My first encounter with dichro was on Telegraph Ave in Berkeley. Small town girl from Nebraska visiting the craziness of Berkeley in the mid-90s. There was so much to see, but I was transfixed when my eyes caught the reflections off of some glittering dichroic rings. I carefully chose two, a green and orange combo and a blue and pink combo. When I asked what is was, I was given two answers..."It depends on what you want to believe. It's either the fire from a dragon's eye, or the metallic coating they use on spaceships."
Those rings are no longer with me. (Did I tell you that people are fascinated with sparkly?) During a summer at one of my most eclectic friends house, a dance troupe from Benin, West Africa visited. While discussing food, music, and then jewelry (in snippets of the French I learned in high school) with the two women dancers that had made the trek to Middle America, we decided to trade baubles. I gave them each one of the rings that sparkled; they had never seen anything like it before. I, in turn, received beads from Africa that I've incorporated into several of my jewelry designs.
But, back to dichro... What is it exactly?Cabinet hardware with dichroic accents.

SAVOY dichroic has a nice little blurb about it...

Dichroic is a high-tech optical coating that selectively reflects certain wavelengths (colors) of light and allows the remaining wavelengths to transmit through. This same effect is seen in nature in peacock feathers and opals. The word "dichroic" means two colors, which refers to transmitted color and reflected color. The coating process is done in a high vacuum chamber that has several pieces of specialized equipment to control and monitor the coating process.
Coatings by Sandberg elaborates a bit more about the process...
Dichroic Glass is a multi layer coating placed on glass by using a highly technical vacuum deposition process. Quartz Crystal and Metal Oxides are Vaporized with an electron beam gun in an airless vacuum chamber and the vapor then floats upward and attaches then condenses on the surface of the glass in the form of a crystal structure. Our colors have as many as 30 layers of these materials yet the thickness of the total coating is approximately 35 millionths of an inch. The coating that is created is very similar to a gemstone and by careful control in thickness, different colors are obtained. Thus, all our coatings are created using the same exact materials. Originally created for the Aerospace industry, Dichroic Glass is now made available to the artist community through Coatings By Sandberg, Inc. CBS Dichroic Glass is specifically designed to be hotworked in any way but can also be used in its raw form. The main characteristic of Dichroic Glass is that it has a transmitted color and a completely different reflective color. Furthermore, these two colors shift depending on angle of view. With the play of light together with its vibrant color, Dichroic Glass is a prime tool used to add interest to any piece of work or project.
I also discovered here that the "spaceship theory" from Telegraph Ave. was a bit closer to the truth. CBS talks about the more technical uses of dichroic, "Dichroic Glass was originally created for the Aerospace industry for Satellite mirrors, but it now has many technical uses including: Lighting, Fiber Optics, Infrared Lazers, Motion Picture Equipment, Sun Glasses, and more."

Any glass artist who has tried to photograph their pieces, especially dichroic pieces, knows that it is incredibly difficult to catch the nuances and beauty of dichroic glass. But, CBS has some beautiful close up shots of dichroic glass on their home page.


Disclaimer....I get NO compensation for linking to any outside sites. Though, wouldn't that be nice?!?

Tuesday, July 20, 2010

Fused Glass Sun Catcher this Sunday!


There's still time to sign up if you're interested! Know a young person you'd like to come with? Niece, nephew, grandchild, neighbor kids? Bring them over and we'll create some wonderful, one-of-a-kind sun catchers!

Fused Glass Sun Catcher for Kids and Parents - This is a perfect class for kids to make a personalized gift, or just to learn to (carefully) play with glass while spending some quality time with mom or dad. We will create and then assemble a beautiful suncatcher. Class meets for one 2 to 2-1/2 hour session and then a short 30 minute session by arrangement to assemble the sun catcher. Sun catchers will be ready for pick up and assembly 3-5 days after the first session. Class fee: $40 for one child and one adult (includes materials for sun catcher and assembly, and firing) Upcoming class: Sunday, July 25th 10am-12pm

Monday, June 21, 2010

June Newsletter...

*

Calyx Glass


“What’s in the Kiln?”

June 2010 Newsletter

Headed back to the hot shop!

Upcoming Classes

(Refer a friend and receive a 10% discount on classes offered in my studio. Make sure your friend mentions your name when they sign up!)

*Kiln Casting Class - Build your own sculptural art glass piece with translucent glass.
Wednesdays, July 14, 21, 28, and August 4; 6pm-9pm

*Fused Glass Sun Catcher for Parent and Child - This is a perfect class for kids to make a personalized gift, or just to learn to (carefully) play with glass while spending some quality time with mom or dad.
Saturday, June 25 10am-12pm
Saturday, July 10 10am-12pm Sunday, July 25 10am-12pm


*Sampler Platter Class - Explore different materials used in glass fusing including dichroic glass, glass paints, fusible paper, powders, frits, stringers in this new class being offered at the LUX Center for the Arts this fall! (Schedule coming soon.)

Upcoming Exhibition


A to Z Printing Show
Opening Reception: Thursday, July 8, 5:30-7:30pm
Show runs July-August 2010

This is the 90th anniversary show of the Lincoln Artists’ Guild, which I recently joined in April of 2010. Refreshments will be served during the show opening at A to Z Printing, so come out and support your Lincoln artists!
Here’s a little preview of what I’ve got in store...

“Patchwork Platter,” 9.25" x 5.5"

This is a fused glass plate that I’ve just recently put together, but I’ve had the parts for quite awhile. There’s a lot of texture and color going on in this one and you’ll have to come to see it to truly appreciate it!

“Ode to Kim Peters Brill,” detail

There are so many talented glass artists out there and one in particular was the inspiration for this in-progress piece. Check out Kim Peters Brill’s website and see why I was so inspired!
I’m still adding a few elements to this piece to make it truly my own. So, it will be unveiled at the show opening!


Don’t know if you noticed that little picture of me smiling and happy in beautiful Napa, California in my hot glass gear up at the top of this newsletter, but...

I’m headed back to the hot shop! Or rather, the Hot Shops Art Center up in Omaha. I’m going to be playing with hot glass again!!!! It’s been months since I’ve been able to travel to a studio with a glory hole and all the equipment necessary to blow glass. It’s an expensive art form, but it’s so worth it!

If you ever get an itch to try it, check out the classes Ed Fennel offers at the Crystal Forge.


Cooking up some Bourbon in the Maker’s Mark kitchen!


My husband and I just got back from a week long trip to Kentucky! We had a great time sight seeing, checking out the Bourbon Trail (and learning the proper way to taste Bourbon), and enjoying the local restaurants. BUT, the reason we went was for the 2010 Glass Art Society conference. It did not disappoint!

I have never been before, and on a whim I signed up when I saw a call for more conference volunteers on Facebook. With the reduced conference fee that work exchange offered, I was actually able to consider the trip, and thus was born our spontaneous trip to Lousiville!

Louisville is home of Churchill Downs,
thus their public art pieces are horses.


The conference organizers did a fabulous job of getting the town on track for hosting an international glass convention as all the museums and galleries in town highlighted glass art. There was no way I was able to see all that there was on offer, but what I did see was incredible! Three different hot glass centers with renowned glass artists such as Lino Tagliapietra (Italian master blower), Paul Stankard (instantly recognizable flowerscapes), Amy Rueffert (gorgeous hot glass “collages”), and too many more to even begin to name hosted demos. The lectures at the conference center were informative and engaging (Who knew you could bond glass at room temperature with no glue?!?). As a bonus, I even made a bunch of new contacts and friends! I’ve decided that I will be going to this conference every year!

Downtown Louisville is incredibly charming with public art dotting the scenery everywhere! I’ll leave you with this spattering of public art bike racks...
*****


Thanks for reading and feel free to forward this on to your friends!


Carrie Strope


Sale for this month: Receive a 10% discount on any purchase from my Etsy shop.


Purchase the item making sure to mention “June Newsletter” in notes to seller. Then, wait to receive a revised invoice by email. Pay as usual (through PayPal), and I will send your item as soon as payment posts!


Friday, June 4, 2010

Fused and Slumped Sampler Platters


The Sampler Platter fused glass class is officially over and it was incredibly successful! I'm so happy with the plates that my students put together!


This is a detail shot of one of the plates. You can see the blue tile in the middle that was made during the frit, powder and stringer session has been capped with clear glass and accented with a tea light flame worked star-shaped stringer. As always, the dichro bits just don't photograph as strikingly as they appear in person.


This plate makes me think outer space, galaxy, the next frontier...Cool, huh? Great job, Alycia!


My plate was not as successful...Don't get me wrong, it showcased every possible technique I could think of for a beginners' class, to a fault! Unfortunately, some incompatible glass found it's way into my scrap bin. What?!? How the heck did that get there?!?


So, how do you tell it's incompatible? Well, if you've been following me for long, then you know I've run into this problem before...and thankfully, it's only MY plate that's ever affected! So, as soon as this plate made it's way out of the kiln, I knew something was amiss...

If you look closely at this photo, you can see the hairline fractures at the edge of the two blue squares. See that? That's incompatibility. The crack follows those blue pieces too well to be anything else! And guess what else? When I scored my plate to free the pieces, the knocks with the hammer (gentle taps on the underside of the score) broke those pieces out almost perfectly! So, after removing the blue glass, I refilled the voids with some aventurine green scrap pieces to melt back down into one. It's currently in the kiln, and with any luck will be a slumped platter within 24 hours!


Here is the other platter from the class that is awaiting a slump firing. It is also currently in the kiln. My new-ish Paragon Pearl-22 and I are still getting to know each other. The first firing just didn't fire hot enough or long enough and I wasn't happy with the fact that you could feel the seam between pieces on the underside of the plate. With Pooja's permission, I also drilled a little hole in the middle to see if I could squeeze the biggest bubble out. We'll soon see how well that turned out!

Wednesday, May 12, 2010

Bending stringers and cutting dichroic...

Tonight, we started the class period by creating a dichroic element for addition into our finished plate. I didn't snap a before picture, but it really won't make much difference as with the low firing temperature (1425 degrees F for 5 minutes) I was really just aiming for a tack fuse; something to hold the pieces in place. But, the kiln is still at around 350 degrees F, and it shouldn't really be opened to prevent the glass inside from stressing and potentially cracking. However, since the pieces that were fired are thin and small, and will be fired again into the final project; I opened the lid quickly to get a quick snapshot (which was very dark and I had to overexpose using a little digital photo editing so that you can see any detail at all).
After my student programmed the kiln (with a little guidance), we began working with stringers and candles to create more decorative elements for next week when we cut the pieces apart and put them back together.
Here are some retro-y looking square swirls that I created by holding the stringer over a candle flame and manipulating with tweezers. You simply hold the 1mm stringer over the flame (at the very tip of the flame) until it starts to bend with a little pressure. If it starts to move in a direction you weren't expecting, simply pull back out of the flame to cool before heading back in to reshape.

Playing in the flames made me want to get back in the hot shop. It's not exactly the same as working with a glory hole, but the concepts are similar...just a bit.

To finish up the session, we broke out the Glassline paints and paintbrushes to decorate some Thinfire. (This, too, will be an element for our finished plate.) At this point, my 2 year old niece decided that she wanted part of the action, as well. While sitting watching mommy paint with the green paints, she chimed in, "Me paint;" and even though I kept telling her we'd paint the next time she came over, she pressed on. "Me hold paper." Mmm, okay..."Me paint." Oh, okay...so, she did:) A little pink, some red, a bit of orange, and a lot of water. She's on her way to becoming the world's youngest glass artist, perhaps?
Alongside, mommy and my niece's pieces is a sample that I created to test my theory of Thinfire being paint-able and fire-able. It worked, so I added some powdered polka dots to up it's interest level.
I also assigned some homework. In order to incorporate all of the techniques we've been experimenting with into one plate and make it look spectacular, we are going to cut up our sample tiles; maybe not all of them, but definitely some of them. I warned my students from the get go. "Do not get attached to the individual tiles." It is hard. I speak from experience. In fact, just this week I was finally able to cut up a particular painted piece that I made over a year ago for inclusion in another piece. It was a beautiful pattern, but it was also not a stand alone piece. I'll unveil pictures soon;)
I digress...do not get attached. This is actually a good mantra for glass art in general, as you never "really" know what's going to happen in the kiln. Sure, MOST of the time everything turns out as you expected (once you know what to expect). However, there's always the chance that something will shift, an element goes out, a program went wrong, a bubble formed...It's a great practice in letting go. So, to further this practice, we'll be looking at our sample tiles through "viewfinders" (squares cut out of a white cardstock). We'll move the windows over our tiles to see what particular areas will look like when we cut them. Hopefully, this will aid in the letting go of the tile process, to break the pieces down into smaller parts in order to create a new composition. I'm really excited for next week, when we'll start to cut the tiles apart and then piece them back together.
One last little "food for thought." Next week, we will potentially be incorporating dichro slide into our compositions. It's a very subtle look and adds a nice, shimmery appearance. Above, I fired small sample stripes between two layers of stained glass (from the same sheet). It seemingly does not need to be capped, but I haven't poked at it with anything aside from my fingernail.
Salut!
Friday, May 7, 2010

Playing with Powders, Frits, Stringers, and bits...


In this week's "Sampler Platter Class," we played with powdered glass, frits, stringers and scrap glass bits. In preparation for this class, I went to Hobby Lobby and spent an hour and a half scavenging for useful templates to use with our sifted powders. I found some little adhesive dots sheets in the scrapbook section, some plastic needlepoint canvases, a couple of orange rubber painting combs, and a multitude of other things that I didn't go looking for, but couldn't pass up. (NOTE: I've placed links on the items that I bought because I was too lazy to add pictures of them, and I didn't describe them very well.)


[SAFETY NOTE: When using glass powders, make sure to wear a dust mask and work in an area free of drafts to avoid breathing glass!]


Here are some before and after pictures of the pieces that my students and I worked on. You can see that when you're applying powders, you really have to apply them in a thick layer, otherwise they just disappear after they're fired in the kiln. Opal powders (opaque) will show up better than transparent powders will. I've posted some closeups of the pieces so you can examine them both before and after to see the change in colors and texture. I fired them at 1440 degrees F and held for only 5 minutes.


On the opal blue tiles, I believe it was pumpkin orange powder (opal) that was sifted on the pieces. You can see how much it disappears after it's been fired, even though it looks like it's on fairly thick and is perfectly visible unfired.


On the clear tiles, the same pumpkin orange opal powder was sifted on and you can see that it was put on much thicker than on the opal blue tiles. It also still looks transparent after firing although it's an opal powder.


On the pink opal tiles, I used (yes, again) the pumpkin opal powder. I used the No Days Mosaic Adhesive and a paper punch flower tool to create the adhesive shapes that I wanted. After I arranged them in the spots where I wanted them, I held the glass tile over a candle flame until the adhesive started to melt. Then, I sifted the powder on heavily, let the glass cool down and knocked off the excess powder. On the other tile, I drew a squiggle with fuser's glue and sifted powder on top of it. Then, I knocked off the excess.


My class is playing with different techniques and materials used in glass fusing, but the ultimate idea is that when we are done, they will have a plate that incorporates all the different sample tiles we are making.


Whether or not the sample tiles are judged "successful" as a whole won't matter so much in the end piece as the tiles will potentially be cut up into smaller pieces and reassembled.


Using powders, frits, stringers, etc. to alter a piece of glass and create texture and pattern is a favorite technique of mine. I feel it really enhances the final piece as the piece is truly original and less generic.


With last week's painted pieces, I've already created some great quilted brooches and quilted coasters. With the intention of creating even more quilted plates, I've filled the empty space in my kiln with larger pieces of opal glass that I've dusted with powdered designs. I'll end up cutting these up to incorporate into quilted plates.

LinkWithin

Related Posts with Thumbnails