Showing posts with label fusing. Show all posts

Friday, June 4, 2010

Fused and Slumped Sampler Platters


The Sampler Platter fused glass class is officially over and it was incredibly successful! I'm so happy with the plates that my students put together!


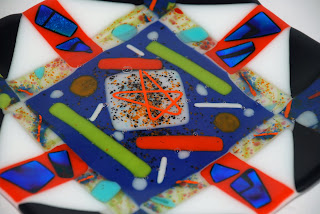
This is a detail shot of one of the plates. You can see the blue tile in the middle that was made during the frit, powder and stringer session has been capped with clear glass and accented with a tea light flame worked star-shaped stringer. As always, the dichro bits just don't photograph as strikingly as they appear in person.


This plate makes me think outer space, galaxy, the next frontier...Cool, huh? Great job, Alycia!


My plate was not as successful...Don't get me wrong, it showcased every possible technique I could think of for a beginners' class, to a fault! Unfortunately, some incompatible glass found it's way into my scrap bin. What?!? How the heck did that get there?!?


So, how do you tell it's incompatible? Well, if you've been following me for long, then you know I've run into this problem before...and thankfully, it's only MY plate that's ever affected! So, as soon as this plate made it's way out of the kiln, I knew something was amiss...

If you look closely at this photo, you can see the hairline fractures at the edge of the two blue squares. See that? That's incompatibility. The crack follows those blue pieces too well to be anything else! And guess what else? When I scored my plate to free the pieces, the knocks with the hammer (gentle taps on the underside of the score) broke those pieces out almost perfectly! So, after removing the blue glass, I refilled the voids with some aventurine green scrap pieces to melt back down into one. It's currently in the kiln, and with any luck will be a slumped platter within 24 hours!


Here is the other platter from the class that is awaiting a slump firing. It is also currently in the kiln. My new-ish Paragon Pearl-22 and I are still getting to know each other. The first firing just didn't fire hot enough or long enough and I wasn't happy with the fact that you could feel the seam between pieces on the underside of the plate. With Pooja's permission, I also drilled a little hole in the middle to see if I could squeeze the biggest bubble out. We'll soon see how well that turned out!
Thursday, November 6, 2008

Incompatible...Glass, that is....

I've been meaning to take and post these pictures for quite awhile, now. So, don't fret yourself by thinking that my gorgeous blue and orange ribbon stitched quilted plate has suddenly shattered!
No, this plate is the first generation plate; the one made entirely of scrap glass, and because of that, alas, I found some incompatible glass laying in the wrong bins at the studio. However, this "unfortunate" incident lends itself nicely to a fabulous learning experience.


Many beginners to glass fusing ask if they can use old stained glass scrap that they've got lying around. The broad answer to that question is "No" due to reasons of incompatibility. You see, glass that has been specifically formulated for fusing "plays nicely" only with other glasses that have also been specifically formulated in the same way. The label "COE," or "Coefficient of Expansion," is the general term that describes the rate in which glass expands and contracts upon heating and cooling. If you are using two glasses that have different COEs for fusing purposes, then your final result will end up looking similar to my lovely sample plate. (Again, the COE will generally get you through the long explanation, but if you want all the juicy details of compatibility, check out TechNotes 3: Compatibility of Glasses from Bullseye.)


However, you may not have a disaster like this the first time out of the kiln! For reasons best left to the Glass Gods, this particular plate did not crack until after it's second time out of the kiln. Only when I was engraving the bottom of the plate did it "pop" in two cracks diagonally down the middle. Initially, I thought it was my engraving that broke the plate.
So, I put the plate back in the kiln to fuse it back together at a full fuse, once again. Fortunately, the third time out of the kiln was a total crack up, around each and every one of the orange pieces, allaying my guilt at having cracked my plate upon engraving.


So, what happened?!? By looking at the slivers that have formed in circles surrounding almost each and every piece of orange glass, we can be suspicious that this glass is not compatible, which all of the other glass that I was using happens to be. In other words, the rate at which the orange glass contracted upon cooling was slower than the rate at which the rest of the glass contracted. As the glass became less fluid, the only way for it to get rid of all the stress building up inside was to crack!

Friday, August 29, 2008

What happened?!? Stressed Out!


Voila!! I had recently set my Tree of Life fused glass plate aside, adding it to the pile that I had yet to photograph. I really love the aventurine green with the iridescent amber and swirly opal green/white glass. The colors are beautiful, reminiscent of summer, and make me want to do an entire series of winter, spring, summer and fall tree plates.

However....
when my wonderful fiance was tidying the house (and organizing my piles, he really is incredibly sweet), he noticed this crack in the plate. Now, I don't know if it's the weather, or if it's just that time in my life when I get to learn about stress and glass, but instead of throwing the blame on him (He must've dropped something on it, right?), I somehow knew that I had another stress case!
But, how exactly would I know? It surely doesn't look like a case of incompatible glass. Look at that S-curve that doesn't follow any seams. It runs right through the middle of at least three pieces of glass (which are all different colors). Reference this link for a wonderfully, hideous picture of incompatible glass.
Aha! My first chance to use the polarizing lenses that have been sitting in the studio, just waiting to confirm my suspicions... Whoa, Nelly!! Just look at that stress!!! I've been told that after a stress break, you can no longer see the stress halo when the piece is placed between the polarized lenses. Well, if that's true, then just imagine the halo that was apparent before this fracture.
So, what to do now? I'm going to put my poor little tree back in the kiln. Yup, throwing her back in. I'm gonna slowly go up to 1250 F and bring down the edges, then go up to 1480 F again to fuse the crack back together. But, this time, I'm slowing down the annealing schedule and holding for a bit longer, because that, I think was the culprit. I used the smaller kiln (Paragon Fusion7), and did not hold my poor plate at 1050 F for long enough.
Hopefully, that will solve my problem, 'cuz I'm getting tired of seeing breaks:(

Sunday, May 13, 2007

Playing with Powders

Today, I played around in the studio and got quite a bit accomplished, I'd say.
First, I cleaned up a couple of mosaic-ed stepping stones and poured the cement for mine. I'll have pictures up of that Monday or Tuesday, I imagine. The cement we used, Quikrete, takes 24-48 hours to set, depending upon the size of stone made.
After pouring my stone, I UV glued the bases on some of the Intermediate Glass Class Final Projects. So, that means that mine is finished:) Here are pictures from all angles:

I used a quote from As A Man Thinketh, by James Allen, "Dreams are the seedlings of realities."
When viewed from the side or the top, you can see the layers of glass used. There were three 1/4" thick pieces of glass "painted" with powders, and two 1/8" glass spacers to add depth. It was on one of these spacers that the quote was written on.
The piece is translucent, and from the back you can still see all the layers, although it's not as impressive from that angle...
After gluing this piece to its base, I soldered up the rest of the pieces for my stained glass mirror. It is now ready to assemble, apart from the cutting of the actual mirror.

Lastly, after loading the kiln, I started on a "palette project." I have decided that I really like working with glass powders and the painterly effect that they offer:

I started this one as an example for my fusing student and it evolved into a princess and dragon scene with a few paramecium thrown in for good measure:)

I love the shadow that the piece cast, and I'm thinking that I'd like to make a series of sconces.
So, my "palette project" consists of using different powders together to come up with a palette of colors for use in future "paintings." I'll post pictures when I have the samples all finished and fired.

Monday, May 7, 2007

Happy Anniversary, Mark and Lindsay!

Our friends Mark and Lindsay got married last year, but at the time, we had no idea what to get them. So instead of just getting something for the sake of getting something, we opted to wait until inspiration hit. And Wow, did it hit.
Check out the spread on this plate!


I have fallen in love with the Spectrum 96 glass that I've been working with lately. It does all the work, and I just cut!
However, the plate would have been entirely too naked presented all by itself. So, Todd and I went to Rainbow Coop in San Francisco to pick up some wonderful cheeses to accompany the tray.
I have to say that it was very difficult to pick a favorite, they all had their own appeal.


On the top left side of the platter is a Vermont, Taylor Made Farms Maple Smoked Gouda, sweet and milder than hickory-smoked gouda.
Top middle is the Welsh Red Dragon, a smooth, firm Cheddar made with Welsh brown ale and mustard seeds.This cheese is buttery and a bit spicy.
On the top right side of the platter is a Dutch Delft Gouda, a cow's milk blue cheese that was slightly crumbly but still a bit creamy.
We had an Ubriaca del Piave (from Bellunao, Italy) a couple of months back and it was wonderful. However, it is only on the market for a few months. So, when we asked for Ubriaca this time, we were guided to the Drunken Goat Cheese from Spain.
It is washed with wine as it ages.
The Carr Valley Mobay sits in the middle of the platter at bottom and is made in two halves with grapevine ash in the center. One half is made with goat’s milk, the other with sheep’s milk.


Nestled in the middle is a spicy hot, organic, Springhouse Cheese Co., Mike's Firehouse Curds from Petaluma, California, flavored with jalapenos, red peppers, parsley and cilantro. At the bottom right of the platter is the Belgian Chimay Bier cheese, which has the consistency of a soft brie and is washed with Chimay beer while it is aging.

As we assembled the plate, we decided to add some dried fruit: Bartlett pear, mango, gogi berries, hunza berries, cape gooseberries and rainier cherries.

To accompany the cheese plate, I fired an oil and vinegar tray and a smaller salt dish. We also filled a 375-mL wine bottle (that I etched with a bamboo pattern) with an extra virgin manznilla olive oil. For salt, we gave them some Black Lava Salt and 'Alea Pink Salt from Hawaii.

All in all, I think it makes a wonderful gift! I hope they were even half as excited about the whole thing as I am:)

Sunday, April 29, 2007

My Very Own Dichroic Tile


Today, for the first time, I really dug in and played with some dichroic glass. It's always been a bit intimidating for me, because the stuff is so expensive! But, I must say, it was far less painful than I had made it out to be.
For the tile, we started with a 4"x4" piece of thin glass. For the next layer, we used mosaic nippers to break up opaque dichroic pieces, staggering them on the bottom layer. And then, we topped that layer with broken pieces of transparent dichroic glass. The last layer is a thin piece of 4"x4" clear glass.
The tiles will be dammed in the kiln with fiber paper and hot bricks so that they keep their dimensions. After firing, we will cut them, re-fire them at a low temp to soften the edges, then glue on bails, or drill holes into them and they are ready to wear!

The line down the middle of the tile is the score line I made to start cutting it into little pieces for pendants...Then, I remembered I wanted to photograph the before image! So, I've finished snipping it into littler pieces, and the next step is to fire them in the kiln again to soften the sharp edges.

Thursday, April 26, 2007

Beginning fusing and stained glass classes...

Both classes went extremely well this week. Unfortunately, it seems that not many people are interested in fused glass this go around. That just means that my ONE student will get very extra special attention from the three people available to teach her! Also, it means that we can add another independent study night at the studio.
The stained glass class was overwhelmingly popular in comparison. We expected only four students to walk in the door and have now got a class roll of nine! Yea! I have a good feeling about the next 8 weeks and some of the amazing projects that will be spilling out the door in the hands of this group of students.
Well, I'm off to bed to dream about glass and mosaics! Tomorrow evening is the mosaic stepping stone class and I can't wait to make mine! Hopefully, I'll get the chance to head to the new climbing gym in Napa with Todd. I can't wait to try it out.
Goodnight and sweet dreams:)

Sunday, April 22, 2007

I Love My New Dip Dish!!!


Fresh out of the kiln, I'm so happy with the way this dish turned out.
For before pics, check out this post.
Notice how the red glass struck (turned color with the heat) to a bright orange.

Friday, April 20, 2007

New Plate! and I may be close to finishing...

My final project from Intermediate Glass is going in the kiln within the next few days! Finally!
There's been a huge line-up at the kiln for a few months, but it's time... Soon, this piece,

will be totally altogether as one. I'll photograph that as soon as I have it:0)

And these lovely pieces below...
at top : the mold,
the bottom layer of glass in in the middle, and the top layer of glass at bottom.

Also, I assembled a new dish to full fuse. I'll have it out of the kiln and then back in for a slump firing which will give it its shape. I will post those as soon as it's done as well!

Wednesday, April 18, 2007

New Plates and Paperweight...


I DID IT!!!

I went outside on this beautiful day, in the sunny Napa Valley, and took these shots of my newest projects:

This is the fused paperweight I made in February during Bryan Northup's class at M.Mitcavish Glass Studio "Pattern Bar & Kiln Casting."

Kiln casting is the technique. We used firebrick and carved out a design, which we then filled with pieces of glass, including some of the pattern bars.

These are images of the plate I worked on in March, in Intermediate Glass at M.Mitcavish Glass Studio. We created a cut sheet first, which are the three pieces in the middle picture. Then, I surrounded it with the teal green and transparent purple pieces before fusing it together. Finally, it was slumped into a mold to give it the shape.The lovely fruit bowl (at the moment) set is Spectrum 96 COE glass. It's beautiful splotches are the big attraction to this series of glass. I've been working on some cheese plates, with accompanying oil & vinegar dishes to create matching sets. I even created my own mold for the O&V plate!


On my way to the studio...

Yesterday, I finally finished cutting all the pieces for my Frank Lloyd Wright window that I'm working on for the studio. Yea! I'll remember to take my camera today, I hope, so that I can get some pictures up here!

Today, I want to go and play with glass and make some plates and bowls with the new molds that Michele picked up down in Vegas, baby!

Oh, and, if I remember this as well, I've got some plates sitting around that I've been wanting to get online as well. I'll go get that done right now! See you soon!

Thursday, March 1, 2007

My first California Earthquake...

So, I was sitting in my bedroom, pruning back the poor peace lily that's been sitting in sub-zero temps in the back room all winter, when I felt a jolt like someone pushed the room from the outside. Everything moved for a split second, and then stopped. It really spooked me out until a few minutes later when Todd announced that there was just a 4.2 magnitude earthquake centered in Lafayette (about 30 miles SSE of Napa). Wowsers!!
Now I know.

On another note, I just finished writing out the quote, "Dreams are the seedlings of realities," from James Allen's book "As a Man Thinketh," on a 1/8" piece of clear glass to be fired with my dimensional "painting" project. See the pictures below for a better idea of what I'm talking about:


The three layers of 1/4" thick glass laid out side by side...


and the three stacked upon each other. Next week, I'll add the text layer. After that, a little UV glue to secure it to a base, and the piece should be finished.

Tuesday, February 27, 2007

Glass and Things:)

So, my Dad's back home from Napa and I, myself, am just getting back to the studio. This Thursday is my last intermediate class with Michele at Mitcavish Glass Studio. Really cool final project I've got going, if I do say so myself - and I do!
It's this layered glass project, where we're "painting" with powdered glass. I've got a cherry blossom thing going on, and in each layer there're flowers and branches, and eventually a quote from Gandhi, "Be the change you wish to see in the world."
In total, it will consist of 5 layers of glass and I can't wait to see how it turns out! I'll add photos to my gallery as soon as the pieces are finished. Michele has been firing the kiln madly for the last week and the shelves are still overflowing with projects that need to find their way in.
I went to the studio today and drilled some holes in some slumped lamps that Michele has been working on; I'm going to help her wire them so that I can learn how to make my own cool lighting...
And that's that! Just sitting on the couch with a blanket on, cuz it's COLD! (Not that we've had 10 inches of snow or anything like that, just poor insulation in this wretched old house:( ) And enjoying a nice glass o' wine. It's Todd's new cheap favorite: Big House Red from Bonny Doon.
Tomorrow, I'll be heading to the studio to unload the kiln of the 1440F pieces we fired on top of dura-board, and getting it ready to fire a full fuse. But, since Michele just ran out of thin fire (Dog Gonnit!), we have to brush on about 5 layers of kiln wash (brush, let it dry, brush, let it dry, brush,...you get the picture) before we can load it up again. I'm very anxious to get my pieces in for their last firing (hopefully) before full fusing them all together in a dam. Barring any touch-ups that need to be made, that's the final step before my masterpiece is through! Ya-hoo!

LinkWithin

Related Posts with Thumbnails