Showing posts with label fused. Show all posts

Friday, October 29, 2010

Fused Glass Coasters with a Quilting Theme

The holidays are around the corner and I've been busy listing my "quilted" fused glass coasters on Etsy. It's such a long process from start of a project to the final listing...I thought I'd share the whole process with you!

The very first step is choosing a quilt block pattern and colors for the block. But, seldom have I ever used a solid fabric in any quilt I've ever sewn. I'm drawn to patterns, usually large floral, colorful and bright designs. However, for this particular example below, I was aiming for mimicking earthy, woven-textile inspired "fabrics." So, in order to turn this:
into this:
I got out my enamel paints, glass powders and tools. For the pattern on the turquoise, orange and brown glass, I first went over them with a light wash of watered down enamel paints (I used Glassline paints, and I think it was a blend of paints from my used paint palette.). Once the light coating dried, I was able to scrape design lines into the paint, with a sgraffito-like technique. Then, I added gold paint highlights and splatters. On the french vanilla piece of glass, I used glass powders exclusively for my design, sifting through plastic needlepoint canvases in different shapes. To add a wavy texture on one side, I dragged a triangular wood-graining tool across the sifted powder.
After patterning my "fabric" glass, it needs to go in the kiln to a low temperature of around 1380-1400 F, just so the paints and powders adhere to the glass. Then, after the glass has cooled back down to room temperature, I can cut it into the pieces needed for constructing my quilt blocks. Each of these coasters used small squares and triangles pieced together and capped with clear glass. I love cutting all these small pieces! But, because of the number of pieces and the fact that I like a nice, straight, clean edge...I have to fire the pieces in the kiln twice more before they come out like this:The in-between stage involves lots of grinding (cold working) with a diamond coated bit and water to get rid of lumps and bumps on the edges of the pieces. They look so much nicer for the extra bit of work, though!
Next, come the rubber bumpers on the bottom corners to protect your furniture and make the glass coasters nicely stack-able.And for the final touch, I tie a ribbon of rafia around the coasters and attach one of my hand carved and printed lino-cut cards with the name of the quilt block:Voila! Now, all I have to do is photograph the pieces, photoshop the photos, write the listing description, upload my photos, tag the listing with keywords, calculate shipping costs and the cost of the product... Whew!
Simple, really...No? ;)

Friday, June 4, 2010

Fused and Slumped Sampler Platters


The Sampler Platter fused glass class is officially over and it was incredibly successful! I'm so happy with the plates that my students put together!


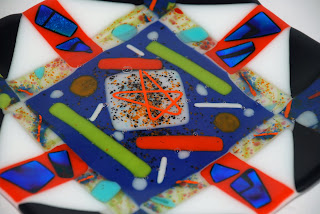
This is a detail shot of one of the plates. You can see the blue tile in the middle that was made during the frit, powder and stringer session has been capped with clear glass and accented with a tea light flame worked star-shaped stringer. As always, the dichro bits just don't photograph as strikingly as they appear in person.


This plate makes me think outer space, galaxy, the next frontier...Cool, huh? Great job, Alycia!


My plate was not as successful...Don't get me wrong, it showcased every possible technique I could think of for a beginners' class, to a fault! Unfortunately, some incompatible glass found it's way into my scrap bin. What?!? How the heck did that get there?!?


So, how do you tell it's incompatible? Well, if you've been following me for long, then you know I've run into this problem before...and thankfully, it's only MY plate that's ever affected! So, as soon as this plate made it's way out of the kiln, I knew something was amiss...

If you look closely at this photo, you can see the hairline fractures at the edge of the two blue squares. See that? That's incompatibility. The crack follows those blue pieces too well to be anything else! And guess what else? When I scored my plate to free the pieces, the knocks with the hammer (gentle taps on the underside of the score) broke those pieces out almost perfectly! So, after removing the blue glass, I refilled the voids with some aventurine green scrap pieces to melt back down into one. It's currently in the kiln, and with any luck will be a slumped platter within 24 hours!


Here is the other platter from the class that is awaiting a slump firing. It is also currently in the kiln. My new-ish Paragon Pearl-22 and I are still getting to know each other. The first firing just didn't fire hot enough or long enough and I wasn't happy with the fact that you could feel the seam between pieces on the underside of the plate. With Pooja's permission, I also drilled a little hole in the middle to see if I could squeeze the biggest bubble out. We'll soon see how well that turned out!

Friday, May 7, 2010

Playing with Powders, Frits, Stringers, and bits...


In this week's "Sampler Platter Class," we played with powdered glass, frits, stringers and scrap glass bits. In preparation for this class, I went to Hobby Lobby and spent an hour and a half scavenging for useful templates to use with our sifted powders. I found some little adhesive dots sheets in the scrapbook section, some plastic needlepoint canvases, a couple of orange rubber painting combs, and a multitude of other things that I didn't go looking for, but couldn't pass up. (NOTE: I've placed links on the items that I bought because I was too lazy to add pictures of them, and I didn't describe them very well.)


[SAFETY NOTE: When using glass powders, make sure to wear a dust mask and work in an area free of drafts to avoid breathing glass!]


Here are some before and after pictures of the pieces that my students and I worked on. You can see that when you're applying powders, you really have to apply them in a thick layer, otherwise they just disappear after they're fired in the kiln. Opal powders (opaque) will show up better than transparent powders will. I've posted some closeups of the pieces so you can examine them both before and after to see the change in colors and texture. I fired them at 1440 degrees F and held for only 5 minutes.


On the opal blue tiles, I believe it was pumpkin orange powder (opal) that was sifted on the pieces. You can see how much it disappears after it's been fired, even though it looks like it's on fairly thick and is perfectly visible unfired.


On the clear tiles, the same pumpkin orange opal powder was sifted on and you can see that it was put on much thicker than on the opal blue tiles. It also still looks transparent after firing although it's an opal powder.


On the pink opal tiles, I used (yes, again) the pumpkin opal powder. I used the No Days Mosaic Adhesive and a paper punch flower tool to create the adhesive shapes that I wanted. After I arranged them in the spots where I wanted them, I held the glass tile over a candle flame until the adhesive started to melt. Then, I sifted the powder on heavily, let the glass cool down and knocked off the excess powder. On the other tile, I drew a squiggle with fuser's glue and sifted powder on top of it. Then, I knocked off the excess.


My class is playing with different techniques and materials used in glass fusing, but the ultimate idea is that when we are done, they will have a plate that incorporates all the different sample tiles we are making.


Whether or not the sample tiles are judged "successful" as a whole won't matter so much in the end piece as the tiles will potentially be cut up into smaller pieces and reassembled.


Using powders, frits, stringers, etc. to alter a piece of glass and create texture and pattern is a favorite technique of mine. I feel it really enhances the final piece as the piece is truly original and less generic.


With last week's painted pieces, I've already created some great quilted brooches and quilted coasters. With the intention of creating even more quilted plates, I've filled the empty space in my kiln with larger pieces of opal glass that I've dusted with powdered designs. I'll end up cutting these up to incorporate into quilted plates.

Thursday, November 6, 2008

Incompatible...Glass, that is....

I've been meaning to take and post these pictures for quite awhile, now. So, don't fret yourself by thinking that my gorgeous blue and orange ribbon stitched quilted plate has suddenly shattered!
No, this plate is the first generation plate; the one made entirely of scrap glass, and because of that, alas, I found some incompatible glass laying in the wrong bins at the studio. However, this "unfortunate" incident lends itself nicely to a fabulous learning experience.


Many beginners to glass fusing ask if they can use old stained glass scrap that they've got lying around. The broad answer to that question is "No" due to reasons of incompatibility. You see, glass that has been specifically formulated for fusing "plays nicely" only with other glasses that have also been specifically formulated in the same way. The label "COE," or "Coefficient of Expansion," is the general term that describes the rate in which glass expands and contracts upon heating and cooling. If you are using two glasses that have different COEs for fusing purposes, then your final result will end up looking similar to my lovely sample plate. (Again, the COE will generally get you through the long explanation, but if you want all the juicy details of compatibility, check out TechNotes 3: Compatibility of Glasses from Bullseye.)


However, you may not have a disaster like this the first time out of the kiln! For reasons best left to the Glass Gods, this particular plate did not crack until after it's second time out of the kiln. Only when I was engraving the bottom of the plate did it "pop" in two cracks diagonally down the middle. Initially, I thought it was my engraving that broke the plate.
So, I put the plate back in the kiln to fuse it back together at a full fuse, once again. Fortunately, the third time out of the kiln was a total crack up, around each and every one of the orange pieces, allaying my guilt at having cracked my plate upon engraving.


So, what happened?!? By looking at the slivers that have formed in circles surrounding almost each and every piece of orange glass, we can be suspicious that this glass is not compatible, which all of the other glass that I was using happens to be. In other words, the rate at which the orange glass contracted upon cooling was slower than the rate at which the rest of the glass contracted. As the glass became less fluid, the only way for it to get rid of all the stress building up inside was to crack!

Friday, August 29, 2008

What happened?!? Stressed Out!


Voila!! I had recently set my Tree of Life fused glass plate aside, adding it to the pile that I had yet to photograph. I really love the aventurine green with the iridescent amber and swirly opal green/white glass. The colors are beautiful, reminiscent of summer, and make me want to do an entire series of winter, spring, summer and fall tree plates.

However....
when my wonderful fiance was tidying the house (and organizing my piles, he really is incredibly sweet), he noticed this crack in the plate. Now, I don't know if it's the weather, or if it's just that time in my life when I get to learn about stress and glass, but instead of throwing the blame on him (He must've dropped something on it, right?), I somehow knew that I had another stress case!
But, how exactly would I know? It surely doesn't look like a case of incompatible glass. Look at that S-curve that doesn't follow any seams. It runs right through the middle of at least three pieces of glass (which are all different colors). Reference this link for a wonderfully, hideous picture of incompatible glass.
Aha! My first chance to use the polarizing lenses that have been sitting in the studio, just waiting to confirm my suspicions... Whoa, Nelly!! Just look at that stress!!! I've been told that after a stress break, you can no longer see the stress halo when the piece is placed between the polarized lenses. Well, if that's true, then just imagine the halo that was apparent before this fracture.
So, what to do now? I'm going to put my poor little tree back in the kiln. Yup, throwing her back in. I'm gonna slowly go up to 1250 F and bring down the edges, then go up to 1480 F again to fuse the crack back together. But, this time, I'm slowing down the annealing schedule and holding for a bit longer, because that, I think was the culprit. I used the smaller kiln (Paragon Fusion7), and did not hold my poor plate at 1050 F for long enough.
Hopefully, that will solve my problem, 'cuz I'm getting tired of seeing breaks:(

Tuesday, April 15, 2008

"Rocky Road" Dip Dishes

I am officially unveiling my newest series of dishes, the "Rocky Road" dishes.
Made up of several cut pieces of glass in browns, reds, and vanilla. This series is very time consuming to produce, but I absolutely LOVE the results!

Tuesday, February 12, 2008

Swimmy's New Friend....

Etsy seller thebirdsandbees sent a felted fish, inspired by Swimmy, to the Etsy folks in Brooklyn. Based on the video below, the folks at Etsy are now going to make a diorama of fish, arranged as a big fish...

So our vision is to be the eye — to be a kind of organizing principle. We do not want Etsy itself to be a big tuna fish. Those tuna are the big companies that all us small businesses are teaming up against.

Those big companies are holdovers from the days before the Web existed. And any company that is being run the same way now as it was before the Web came about is due for some massive restructuring or deflation.

Etsy is a company born on the Web, literally. I see the company itself as a handmade project, and we'll continue to build it this way. There's much more to do, and we're up for the challenge.

I decided to take the call for Swimmy's friends as a challenge! I also wanted to incorporate the style of the Northwest Coast Native American/Canadian Tribes that I was exposed to this past year during my trip to Vancouver.

Saturday, February 2, 2008

Been Just A Little Busy Lately....

But, you know, the busier you are, the more you get done!! Isn't that the crazy part?!?
So, I've been working on some new freeze-n-fuse pendants....I've got just the glass part done. I've wanted to create enough that I could work on incorporating them into Silver Art Clay in one session.
Also, there's a gigantic project at the studio, and we've been working overtime to get it finished. I've not got any beautiful pictures to show...but this project has got sandblasted, fused, and painted elements incorporated into the leaded glass windows. Below is me, prepping some pieces to get sandblasted. The glass is flashed glass, which in this case means that there is a thin layer of blue glass on top of a thicker layer of clear glass. When these pieces are sandblasted, the leafy area will then be painted with green paint and fired in the kiln to make the paint permanent.

While I was working with the buttercut and prepping for sandblasting, I was able to salvage some scraps to prep for a project that I'm trying to finish for Todd's birthday. Eventually, it will be a stained glass suncatcher of the seven chakras. I was able to dig out some scrap for the red, orange, blue, and violet; but I need to fuse together a green and yellow disk. Can't wait to show you the finished pics. Here's what I've got as of the latest photo session:And, now, for the unveiling of my latest series of pendants:
Sterling silver charms incorporated with tumbled stained glass! I really love these!!
Umm....perfect for your Valentine?

Sunday, June 10, 2007

Magic Misting Fogger Bowl


Yea!!!
Another one of those projects that I've been wanting to work on, I finished the bowl for the LED lit misting fogger that Dad sent my way awhile back.


I used the gorgeous Spectrum 96 COE "Blackberry Cream" OpalArt glass.


The mister sits in the bottom of the bowl, and eventually I'll have a stand for the bowl to sit on.
As well as humidifying the room, and de-ionizing the air, the mister has been purported to cure headaches & insomnia, reduce stress, increase endorphins, moisturize skin and prevent wrinkles, as well as increase your immunity.


I know it humidifies and de-ionizes the air. I can't attest to the other benefits. But, it's definitely pretty to look at:)

Sunday, May 13, 2007

Playing with Powders

Today, I played around in the studio and got quite a bit accomplished, I'd say.
First, I cleaned up a couple of mosaic-ed stepping stones and poured the cement for mine. I'll have pictures up of that Monday or Tuesday, I imagine. The cement we used, Quikrete, takes 24-48 hours to set, depending upon the size of stone made.
After pouring my stone, I UV glued the bases on some of the Intermediate Glass Class Final Projects. So, that means that mine is finished:) Here are pictures from all angles:

I used a quote from As A Man Thinketh, by James Allen, "Dreams are the seedlings of realities."
When viewed from the side or the top, you can see the layers of glass used. There were three 1/4" thick pieces of glass "painted" with powders, and two 1/8" glass spacers to add depth. It was on one of these spacers that the quote was written on.
The piece is translucent, and from the back you can still see all the layers, although it's not as impressive from that angle...
After gluing this piece to its base, I soldered up the rest of the pieces for my stained glass mirror. It is now ready to assemble, apart from the cutting of the actual mirror.

Lastly, after loading the kiln, I started on a "palette project." I have decided that I really like working with glass powders and the painterly effect that they offer:

I started this one as an example for my fusing student and it evolved into a princess and dragon scene with a few paramecium thrown in for good measure:)

I love the shadow that the piece cast, and I'm thinking that I'd like to make a series of sconces.
So, my "palette project" consists of using different powders together to come up with a palette of colors for use in future "paintings." I'll post pictures when I have the samples all finished and fired.

Friday, May 11, 2007

Soldered Pendant Necklaces


Finally, I've assembled not only the soldered pendants, but I've gathered all the components to actually piece together the entire necklace. I've got two beautiful necklaces so far...


These are both made with Czech fire-polished glass beads, about half of them have an Aurora Borealis coating which gives them a gorgeous shimmering effect. Both necklaces are finished with pure silver findings and silver chain measuring a total of 16".


I also thought that my fused plaid pendants could use some dressing up, so I wired this one together with silver chain and assorted glass beads:

Monday, May 7, 2007

Happy Anniversary, Mark and Lindsay!

Our friends Mark and Lindsay got married last year, but at the time, we had no idea what to get them. So instead of just getting something for the sake of getting something, we opted to wait until inspiration hit. And Wow, did it hit.
Check out the spread on this plate!


I have fallen in love with the Spectrum 96 glass that I've been working with lately. It does all the work, and I just cut!
However, the plate would have been entirely too naked presented all by itself. So, Todd and I went to Rainbow Coop in San Francisco to pick up some wonderful cheeses to accompany the tray.
I have to say that it was very difficult to pick a favorite, they all had their own appeal.


On the top left side of the platter is a Vermont, Taylor Made Farms Maple Smoked Gouda, sweet and milder than hickory-smoked gouda.
Top middle is the Welsh Red Dragon, a smooth, firm Cheddar made with Welsh brown ale and mustard seeds.This cheese is buttery and a bit spicy.
On the top right side of the platter is a Dutch Delft Gouda, a cow's milk blue cheese that was slightly crumbly but still a bit creamy.
We had an Ubriaca del Piave (from Bellunao, Italy) a couple of months back and it was wonderful. However, it is only on the market for a few months. So, when we asked for Ubriaca this time, we were guided to the Drunken Goat Cheese from Spain.
It is washed with wine as it ages.
The Carr Valley Mobay sits in the middle of the platter at bottom and is made in two halves with grapevine ash in the center. One half is made with goat’s milk, the other with sheep’s milk.


Nestled in the middle is a spicy hot, organic, Springhouse Cheese Co., Mike's Firehouse Curds from Petaluma, California, flavored with jalapenos, red peppers, parsley and cilantro. At the bottom right of the platter is the Belgian Chimay Bier cheese, which has the consistency of a soft brie and is washed with Chimay beer while it is aging.

As we assembled the plate, we decided to add some dried fruit: Bartlett pear, mango, gogi berries, hunza berries, cape gooseberries and rainier cherries.

To accompany the cheese plate, I fired an oil and vinegar tray and a smaller salt dish. We also filled a 375-mL wine bottle (that I etched with a bamboo pattern) with an extra virgin manznilla olive oil. For salt, we gave them some Black Lava Salt and 'Alea Pink Salt from Hawaii.

All in all, I think it makes a wonderful gift! I hope they were even half as excited about the whole thing as I am:)

LinkWithin

Related Posts with Thumbnails