Showing posts with label project. Show all posts

Saturday, March 19, 2011

artVenture Collaboration with the Girl Scouts

During the month of February, I was able to participate in a program with the Homestead Girl Scouts in Lincoln. I was once a Homestead Girl Scout myself, and would have loved to participated in an art program like this one!
I met with a group of sixteen girls on a Friday night. I explained the process of glass art, a bit about the considerations to keep in mind while working with glass, some safety information, and then they started working.
Together, we made four different collaborative pieces for the auction, then each girl got the chance to make a sun catcher and fused glass pendant to take home!


From the application..."artVenture is an annual art auction fundraiser for the Girl Scouts-Spirit of Nebraska Council A unique feature of the artVenture auction is the collaborative artwork created by local artists and area Girl Scouts working together. Girls learn a new skill, see how an artist works and collaborate with the artist and other Girl Scouts to create a piece of art for the auction. Artists get to demonstrate their skill and technique, expose future artists to a new medium, share what it means to be a working artist and have fun in the process!"


Black & White Platter, 8" x 8", Hannah, Tawny, Gracie and Elyssa

Green Platter, 8" x 8", Gracen, Annie, Sarah, and Madison

Black & White Coasters, 4" x 4" (set of 4), Allie, Julia, Anna, and Reagan

Red Platter, 8" x 8", Katelyn, Audrey, Mia, and Paige

The Homestead/Prairie Hills – Lincoln Auction will be held on Sunday, May 1, 2011 from
3:00-5:00 pm at the Lied Center for Performing Arts (12th and R Street).

I'll see you there!

Thursday, February 3, 2011

Sculptural Stained Glass Mirror Project

I've volunteered to participate in an upcoming fundraiser for The Independence House (a care facility in Lincoln, Nebraska) and the Nebraska Alzheimer Association for their arts program, which engages the residents with various art projects. We, the artists, have each chosen a piece of artwork created by a resident and will be creating a companion piece to be auctioned off at the spring gala.

I had a few different ideas for the project, but it wasn't until I found the mirror (via FreeCycle - donated by a generous family whose aunt is struggling with dementia) that I was able to pull the pieces together.

I gathered my materials together: the antique mirror (dated 1947 on the backside), a fused glass flower cast with frit (donated by a fellow glass artist, Ed Breed), and some stained glass (also a donation from a high school friend, who had to clean house for a friend who died of cancer).


After playing around with the materials, I came up with a general idea for placement.


Jump ahead to post cutting and grinding the glass. I foiled it while watching re-runs of the new Battlestar Galactica. Then, even though I had a rough pattern, the only way that made sense for me to continue was to assemble the leaves into garlands.


So, I soldered and built the garlands, one leaf at a time.


Next, I need to wrap the mirror in lead and figure out the pattern for the glass frame. Keep an eye out:)

Wednesday, November 18, 2009

My Elegant Troll...

I started it more than four years ago, but I've finally finished putting her together! Before my evening soiree with the Lincoln Doll Club, I had but bits of troll in a bag. May I informally introduce.... Ms. TrollUp! You may not have noticed, but she's rather well-endowed. She also doesn't care much for shaving; and I totally understand that!
Like teacher, Ute Vasina, I had to be different! My "Fritz" troll is a lady troll, but as of yet, she's still a naked lady!


I fashioned my troll from the kit for "Fritz" (above) by Ute Vasina. I don't yet know her story...but I think she'll be wearing a lovely green evening gown and showing off her sexy legs!

Saturday, April 12, 2008

CGGE & EtsyBead Creative Minds for Charity!


DSCI1877, originally uploaded by thumbelinacreations.

"The Creative Glass Guild of Etsy (CGGE) and the etsyBEAD Street Team have joined forces for a creative collaboration challenge. CGGE members will create gorgeous glass cabs, beads, and pendants for etsyBEAD members to turn into beautiful pieces of finished jewelry. These pieces will then be donated to the Helping Others Street Team (HOST) in order to raise money for those fellow Etsyians in need."

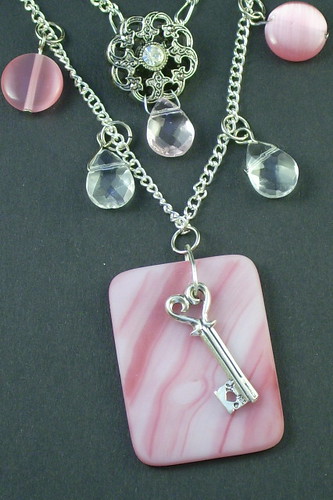
And here is the entry that Jonquil of Thumbelina Creations and I will be submitting. She did such a gorgeous job of tying the piece together! I am in love with the new Key to My Heart Necklace!

Details: The short chain is 16 in. while longer chain is 18 in. The pink marbleized tumbled glass pendant with lead-free pewter key charm is the focal point of the longer chain. The center of the shorter chain carries an antique silver button and light pink glass teardrop. Various other glass beads decorate the chains, as well.
This necklace is very light and comfortable to wear. It doesn't shift around on the neck. And all the glass beads sparkle when they catch the light.

All proceeds will go to HOST...

"What is HOST?" you ask.

From their blog:
"HOST stands for Helping Others Street Team. We are a group of Etsy sellers and buyers who want to help other Etsy buyers and sellers through difficulties weather [sic] those difficulties be financial, emotional or otherwise. We will try to keep an updated list so that you can see who currently needs help. If you see someone you would like to help, please feel free to do so. The help can take many forms; praying, snagging a treasury with some of the people here featured, helping promote threads to help the listed people, buying from their stores, sending needed items to them, helping with cash donations. Sometimes someone simply needs someone to talk to during difficult times. If you are able to help someone on this list, please let one of the members know. If you would like to remain anonymous, rest assured, we will keep you anonymous, but by letting one of us know, we can keep the list accurate as to who still needs help."

Sunday, June 24, 2007

Tree of Life Kiln Casting

After coming up with the idea for the piece, I broke out the clay...


My lovely lump of clay became the tree of life that you see above.

After pouring a mold and allowing it to dry, I kilnwashed the mold and filled it with glass:


Then, pop it in the kiln for a day or two...


I love this method of kiln working glass. This is the second sculpture that I've made, and I've got one more that should be finished soon.

Wednesday, June 20, 2007

Prairie Window Continued...

I'm getting quicker! Yesterday, in the three hour period that I was in the studio, I finished almost the entire (center left) row of diamonds and small mitred cuts of lead pictured here:


The previous row took me twice as long! To see previous stages check here and here and here and lastly, here.

Each time I go into the studio to work on the piece, I devote a three hour period to working on the window. If I stay longer, my patience thins, and I start to make imprecise cuts. Yesterday, however, I felt as if I could keep on going. But, I stopped nonetheless.

Just looking at the pictures makes me want to get into the studio and work on the piece some more... I think I may be coming addicted to leaded stained glass!

Tuesday, June 12, 2007

Frank Lloyd Wright Prairie Window

Still working on the window.
I went into the studio today for another three hours.

So, I did get more done in this session than I did last week. Plus, I cleaned out the bottoms of the glass grinders. They needed it!

Yesterday, I worked at home in my garage studio.
I soldered some more pendants, plus I worked on these nifty window tassels:
This is an updated photo, so you'll also notice the beaded suncatcher I recently made hanging in the middle along with a glass ball made by Saint Helena glass artist Ed Breed.

The triangles are purple and cream and look great in the sunroom!

I go back to the studio later tonight. But, before I leave, I'm going to thumb through a book I checked out at the library about Tibetan symbols and meanings. I've got a great idea for some stained glass prayer flags...

Friday, June 8, 2007

View of a Prairie Window

I've been wanting to take pictures of the Frank Lloyd Wright Prairie Window that I've been working on for the last month, but keep forgetting to bring the camera with me when I'm at the studio. Then last week, I remembered to take the camera to the studio to take pictures of my window all cut up, but alas! I forgot the camera battery.

So, I began leading the window, figuring it will be awhile before I finish. I'm bound to get a picture of it at some point. Of course, I was right! It will take awhile before I finish.
Here are the before pictures I took at the studio on Tuesday:

Tuesday afternoons, from 11:00am to 2:00pm, are Independent Study times. In three hours, this is what I accomplished:
See the little area in the middle? The approximately 3" by 7" area with all the mitred cuts, and tiny pieces?!? Yup, this will definitely take awhile to finish.
Fortunately, it's a somewhat meditative process, and I enjoy it - in 3 hour sessions.

Previous posts:
http://www.calyxann.com/2007/04/picture-of-prairie-window.html

Monday, June 4, 2007

My pine cone inspired lips...

This piece is a couple of years old, but I was having a conversation with a friend of mine about painting and getting inspired...


This piece was started as an assignment for a beginning painting project. We were to find an object from nature. After we had our object, we were supposed to replicate the image over and over across the 3'x4' canvas.
I chose a pine cone. Can you see it?

Monday, May 14, 2007

Stepping Stone Unveiled...


I got the original pattern for this stepping stone from a book in Michele's library. However, the mold it used was much bigger than the molds available in the studio. So, I had to sketch it out and scale it down before making the pattern pieces for cutting the glass.
I don't think it's visible in the photos, but I used iridescent glass for the hummingbird's heads. I also threw in some white iridescent glass in the background to give it some sparkle when the sun hits it. For the background, I used the mosaic nippers to break up a bunch of different colors of blue and white pieces to puzzle together.

Sunday, May 13, 2007

Playing with Powders

Today, I played around in the studio and got quite a bit accomplished, I'd say.
First, I cleaned up a couple of mosaic-ed stepping stones and poured the cement for mine. I'll have pictures up of that Monday or Tuesday, I imagine. The cement we used, Quikrete, takes 24-48 hours to set, depending upon the size of stone made.
After pouring my stone, I UV glued the bases on some of the Intermediate Glass Class Final Projects. So, that means that mine is finished:) Here are pictures from all angles:

I used a quote from As A Man Thinketh, by James Allen, "Dreams are the seedlings of realities."
When viewed from the side or the top, you can see the layers of glass used. There were three 1/4" thick pieces of glass "painted" with powders, and two 1/8" glass spacers to add depth. It was on one of these spacers that the quote was written on.
The piece is translucent, and from the back you can still see all the layers, although it's not as impressive from that angle...
After gluing this piece to its base, I soldered up the rest of the pieces for my stained glass mirror. It is now ready to assemble, apart from the cutting of the actual mirror.

Lastly, after loading the kiln, I started on a "palette project." I have decided that I really like working with glass powders and the painterly effect that they offer:

I started this one as an example for my fusing student and it evolved into a princess and dragon scene with a few paramecium thrown in for good measure:)

I love the shadow that the piece cast, and I'm thinking that I'd like to make a series of sconces.
So, my "palette project" consists of using different powders together to come up with a palette of colors for use in future "paintings." I'll post pictures when I have the samples all finished and fired.

Friday, May 11, 2007

Soldered Pendant Necklaces


Finally, I've assembled not only the soldered pendants, but I've gathered all the components to actually piece together the entire necklace. I've got two beautiful necklaces so far...


These are both made with Czech fire-polished glass beads, about half of them have an Aurora Borealis coating which gives them a gorgeous shimmering effect. Both necklaces are finished with pure silver findings and silver chain measuring a total of 16".


I also thought that my fused plaid pendants could use some dressing up, so I wired this one together with silver chain and assorted glass beads:

Monday, May 7, 2007

Happy Anniversary, Mark and Lindsay!

Our friends Mark and Lindsay got married last year, but at the time, we had no idea what to get them. So instead of just getting something for the sake of getting something, we opted to wait until inspiration hit. And Wow, did it hit.
Check out the spread on this plate!


I have fallen in love with the Spectrum 96 glass that I've been working with lately. It does all the work, and I just cut!
However, the plate would have been entirely too naked presented all by itself. So, Todd and I went to Rainbow Coop in San Francisco to pick up some wonderful cheeses to accompany the tray.
I have to say that it was very difficult to pick a favorite, they all had their own appeal.


On the top left side of the platter is a Vermont, Taylor Made Farms Maple Smoked Gouda, sweet and milder than hickory-smoked gouda.
Top middle is the Welsh Red Dragon, a smooth, firm Cheddar made with Welsh brown ale and mustard seeds.This cheese is buttery and a bit spicy.
On the top right side of the platter is a Dutch Delft Gouda, a cow's milk blue cheese that was slightly crumbly but still a bit creamy.
We had an Ubriaca del Piave (from Bellunao, Italy) a couple of months back and it was wonderful. However, it is only on the market for a few months. So, when we asked for Ubriaca this time, we were guided to the Drunken Goat Cheese from Spain.
It is washed with wine as it ages.
The Carr Valley Mobay sits in the middle of the platter at bottom and is made in two halves with grapevine ash in the center. One half is made with goat’s milk, the other with sheep’s milk.


Nestled in the middle is a spicy hot, organic, Springhouse Cheese Co., Mike's Firehouse Curds from Petaluma, California, flavored with jalapenos, red peppers, parsley and cilantro. At the bottom right of the platter is the Belgian Chimay Bier cheese, which has the consistency of a soft brie and is washed with Chimay beer while it is aging.

As we assembled the plate, we decided to add some dried fruit: Bartlett pear, mango, gogi berries, hunza berries, cape gooseberries and rainier cherries.

To accompany the cheese plate, I fired an oil and vinegar tray and a smaller salt dish. We also filled a 375-mL wine bottle (that I etched with a bamboo pattern) with an extra virgin manznilla olive oil. For salt, we gave them some Black Lava Salt and 'Alea Pink Salt from Hawaii.

All in all, I think it makes a wonderful gift! I hope they were even half as excited about the whole thing as I am:)

Sunday, April 29, 2007

My Very Own Dichroic Tile


Today, for the first time, I really dug in and played with some dichroic glass. It's always been a bit intimidating for me, because the stuff is so expensive! But, I must say, it was far less painful than I had made it out to be.
For the tile, we started with a 4"x4" piece of thin glass. For the next layer, we used mosaic nippers to break up opaque dichroic pieces, staggering them on the bottom layer. And then, we topped that layer with broken pieces of transparent dichroic glass. The last layer is a thin piece of 4"x4" clear glass.
The tiles will be dammed in the kiln with fiber paper and hot bricks so that they keep their dimensions. After firing, we will cut them, re-fire them at a low temp to soften the edges, then glue on bails, or drill holes into them and they are ready to wear!

The line down the middle of the tile is the score line I made to start cutting it into little pieces for pendants...Then, I remembered I wanted to photograph the before image! So, I've finished snipping it into littler pieces, and the next step is to fire them in the kiln again to soften the sharp edges.

Friday, April 27, 2007

Finally getting some soldered pendants done!

You may recall back in my March 16, 2007 post, that I mentioned I had some new pendant ideas...
I have finally figured them out completely and have taken the pictures I need:
First, my custom pendants...
This one is for my friend who's daughter is turning 3 this year. Although, I've got presents for her daughter, Sequoia, I thought that it would be appropriate to put together a necklace for Mommy. Someday she can pass it down to Sequoia, when she's old enough to appreciate it.

Another custom image pendant I did was with a photo of a Giant Sequoia:

And then, finally, I finished my stained glass leaf and flower pendants. Very time consuming, indeed! First, you cut all the tiny pieces. Then, you wrap each one with copper foil and burnish. Then, arrange them without letting them slide all over while soldering. Attach a jump ring, rinse, polish, and voila! They are very pretty. I think I'll incorporate them into some beautiful beaded necklaces.

Sunday, April 22, 2007

I Love My New Dip Dish!!!


Fresh out of the kiln, I'm so happy with the way this dish turned out.
For before pics, check out this post.
Notice how the red glass struck (turned color with the heat) to a bright orange.

Friday, April 20, 2007

New Plate! and I may be close to finishing...

My final project from Intermediate Glass is going in the kiln within the next few days! Finally!
There's been a huge line-up at the kiln for a few months, but it's time... Soon, this piece,

will be totally altogether as one. I'll photograph that as soon as I have it:0)

And these lovely pieces below...
at top : the mold,
the bottom layer of glass in in the middle, and the top layer of glass at bottom.

Also, I assembled a new dish to full fuse. I'll have it out of the kiln and then back in for a slump firing which will give it its shape. I will post those as soon as it's done as well!

LinkWithin

Related Posts with Thumbnails